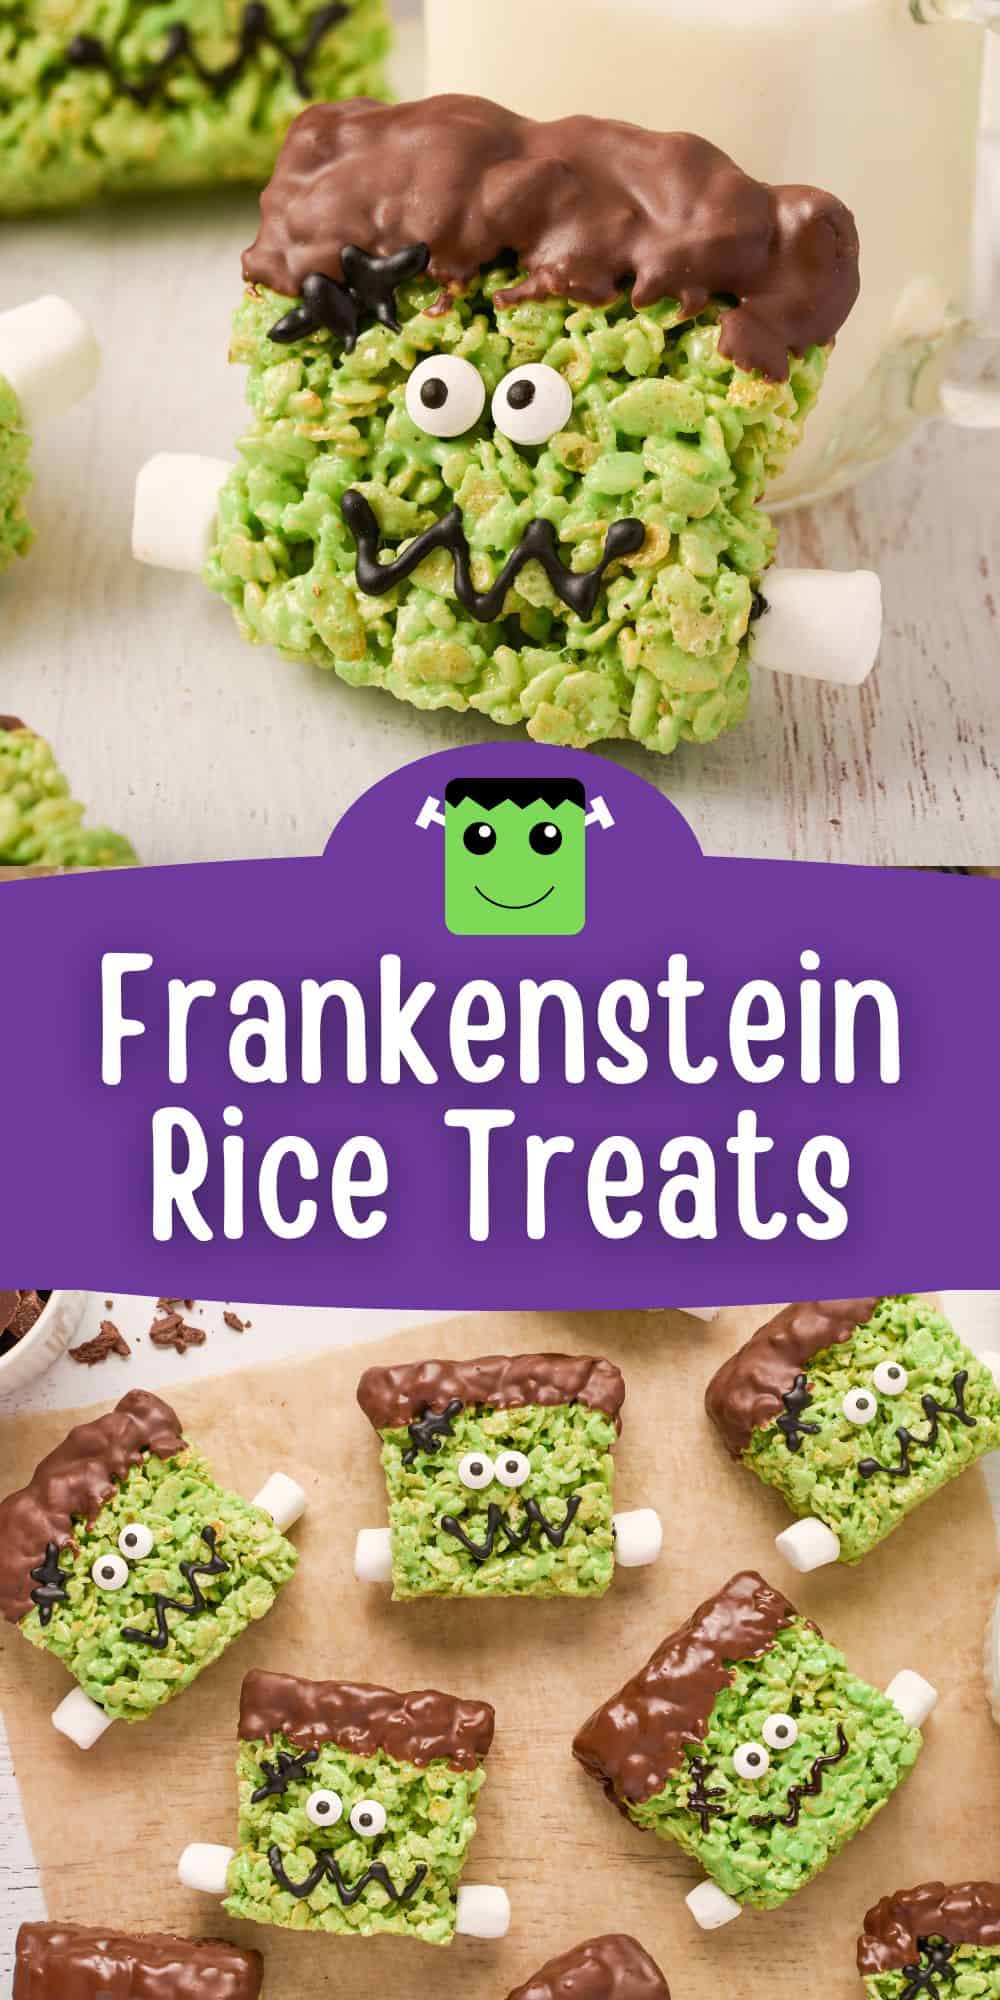
Frankenstein Rice Krispie Treats
Posts may contain affiliate links, meaning that I may earn a commission if you use a link provided.

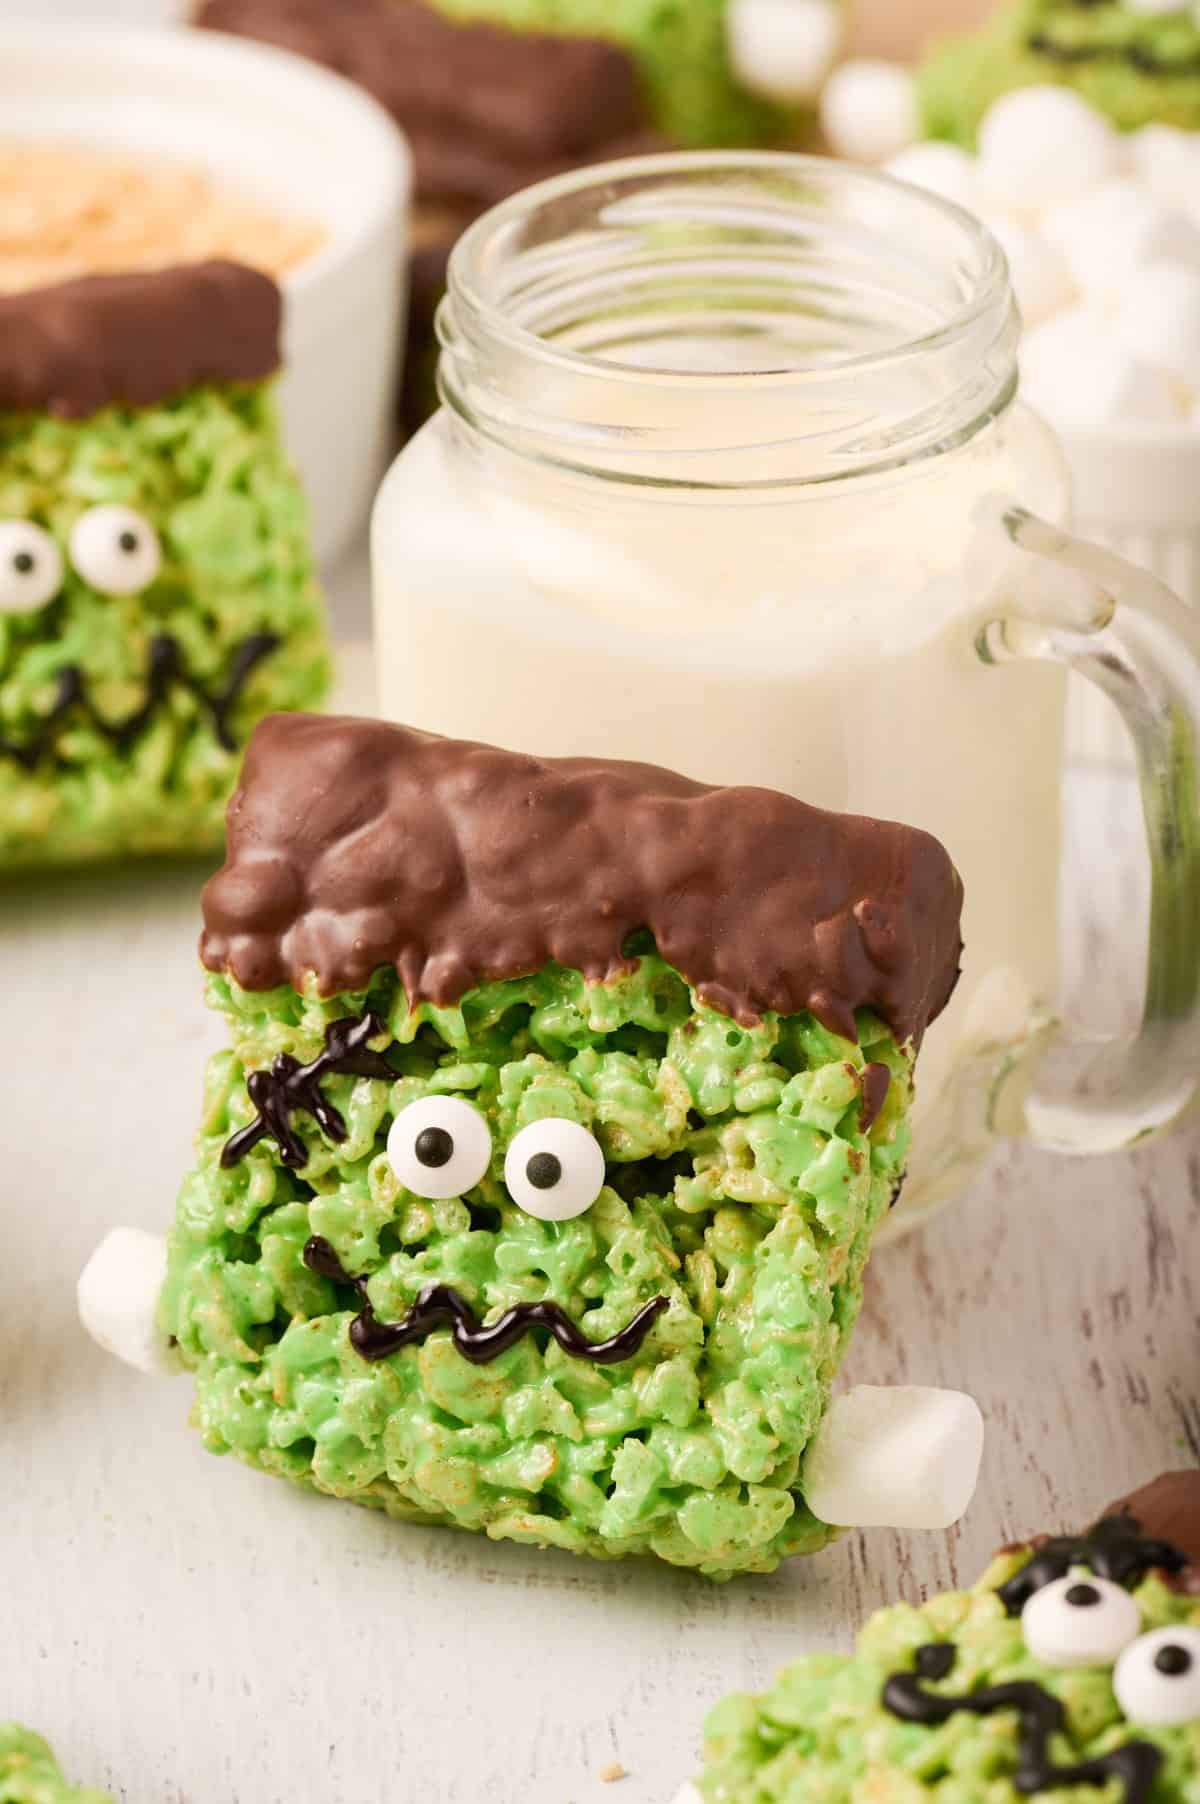
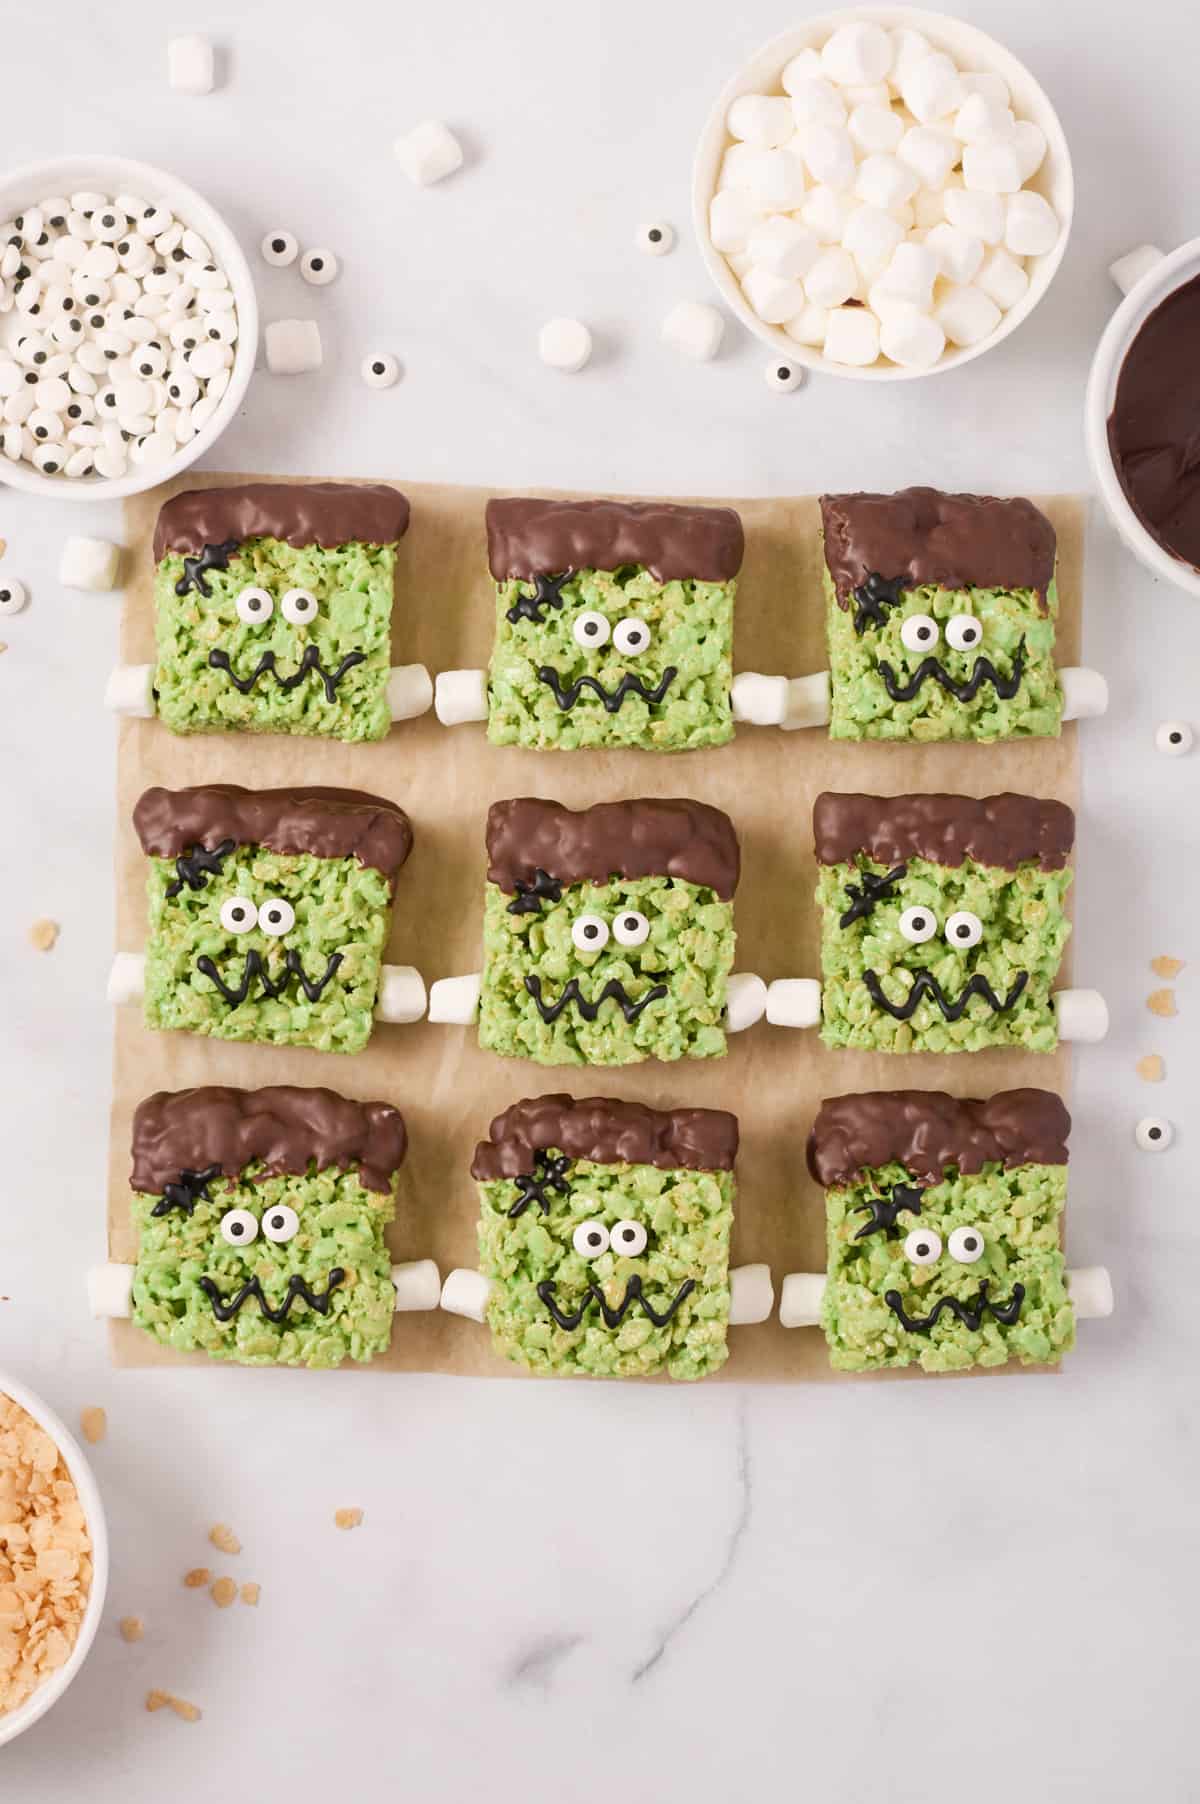
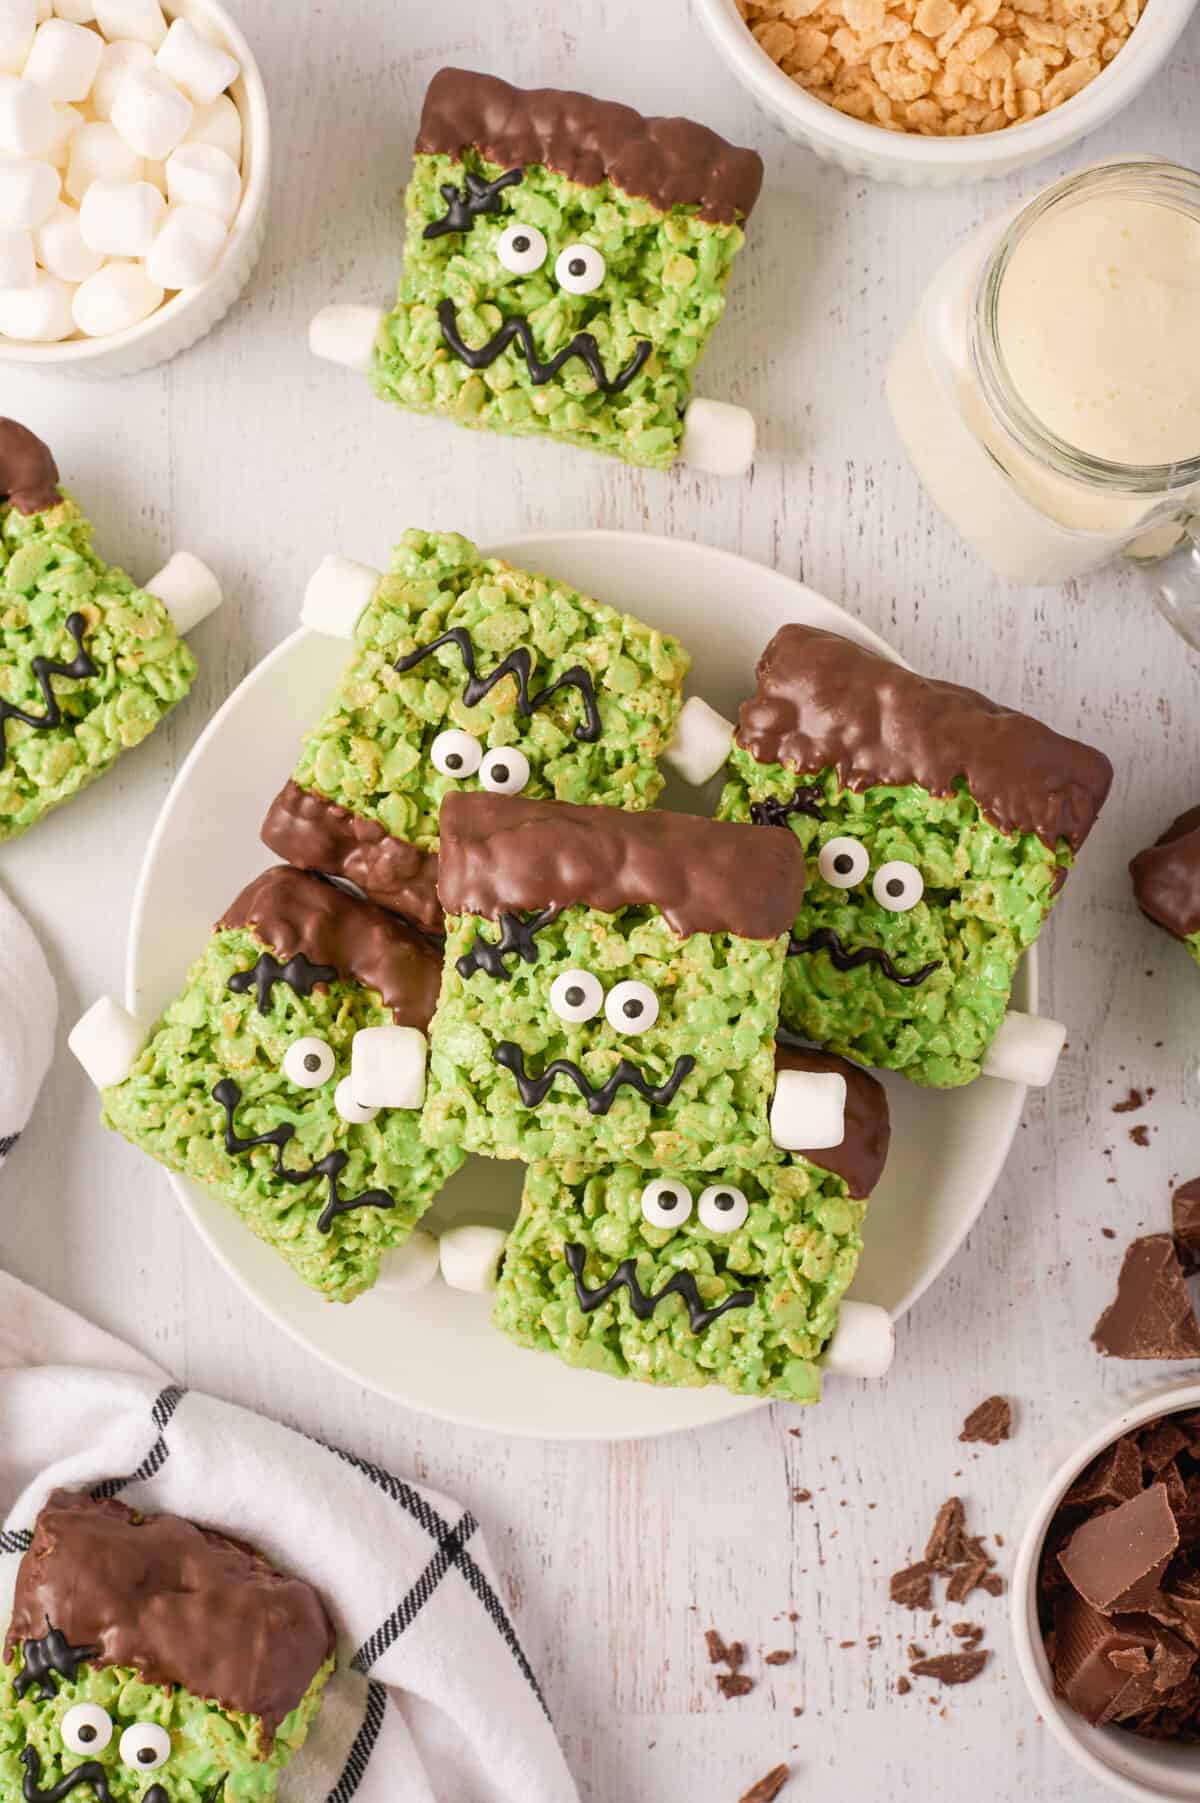
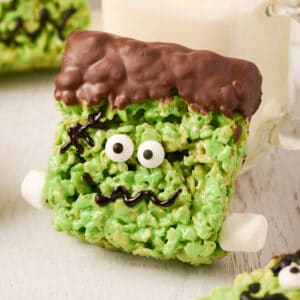
Traditional rice krispie treats get a Halloween makeover with this Frankenstein Rice Krispie Treat recipe. Chewy, gooey, homemade rice krispie treats are dyed green and decorated with candy eyes, melted chocolate hair, and mini marshmallow bolts for a spooky treat perfect for your Halloween party.

Have you noticed that rice krispie treats are always one of the first desserts to go at parties?! Kids and adults alike love the chewy, gooey marshmallow cereal treats. Plus, I love that they are easy to make, no baking required.
That is why I love making holiday-themed treats for different holidays. For Christmas, we make Grinch rice krispie treats and santa hat rice krispie treats. For Thanksgiving, we make turkey rice krispie treats. And for Halloween parties we make mummy rice krispies treats or these cute Frankenstein rice krispie treats, along with other no bake Halloween desserts.
For more monster treats check out these green apple monster bites, mummy cookies, and Frankenstein lollipops. In fact, they would all look great together on a Halloween dessert table along with these Frankenstein treats!
Ingredients for Easy Frankenstein Rice Krispie Treats
This section includes ingredient notes and substitution options. Get all measurements, ingredients, and instructions in the printable recipe card at the end of this post.
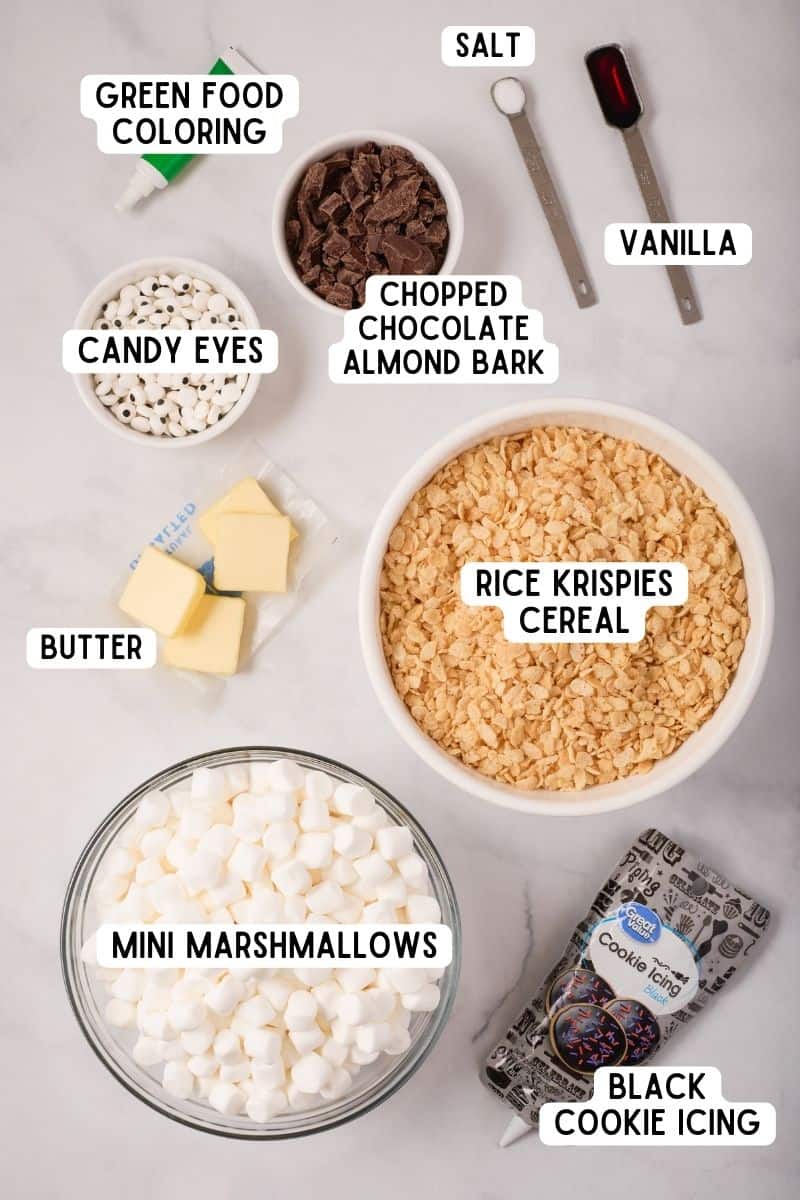
- Mini marshmallows— You can use either mini or large marshmallows to make the rice krispie treats, but make sure to use minis to make Frankenstein’s bolts.
- Unsalted butter— I like to use unsalted butter to control the amount of salt added to the recipe. However, you can certainly make it with salted butter if preferred. Just skip the added salt if you do.
- Green food coloring— Use gel food coloring to get Frankenstein’s green color. Increase the amount of food coloring used until your desired shade is achieved. For reference, the treats photographed used about 1 teaspoon of gel green food coloring.
- Vanilla extract and salt— These ingredients add a little extra flavor to the rice treats.
- Rice krispies cereal
- Frankenstein decorations— Plain rice krispies treats are transformed into spooky Frankenstein snacks with a few simple ingredients: melted chocolate for the hair, black icing for the mouth and scar, candy eyes, and mini marshmallows for his bolt!
Variations and substitutions
Unsalted butter: You can use salted butter and omit the added salt in the recipe.
Cookie icing: I recommend using cookie icing or black gel decorator icing because it is designed to be used for detailed decoration, making it neater and easier to work with. However, if you are unable to get your hands on a tube you can pipe melted chocolate onto the treats using a piping bag with a small round tip or a zip-top bag with the corner snipped off.
Mini marshmallow bolts: Get creative with what use for Frankenstein’s bolts! You can use Rolo’s, Reese’s cups, pretzel sticks, chocolate covered raisins or other small berries or nuts.
Equipment & supplies needed
- Microwave-safe bowls
- Rubber spatula
- 9 x 9 baking pan
- Wax or parchment paper
How to Make Monster Rice Krispie Treats
This section shows you how to make the recipe with step-by-step photos and instructions. For the full printable recipe, see the recipe card below.
Step 1: Lightly spray a 9 x 9 pan with non-stick cooking spray and set aside.
Step 2: Slice the butter into four equal squares. Add the butter and mini marshmallows to a large microwave-safe bowl and microwave for one and a half minutes. Then, stir until smooth.
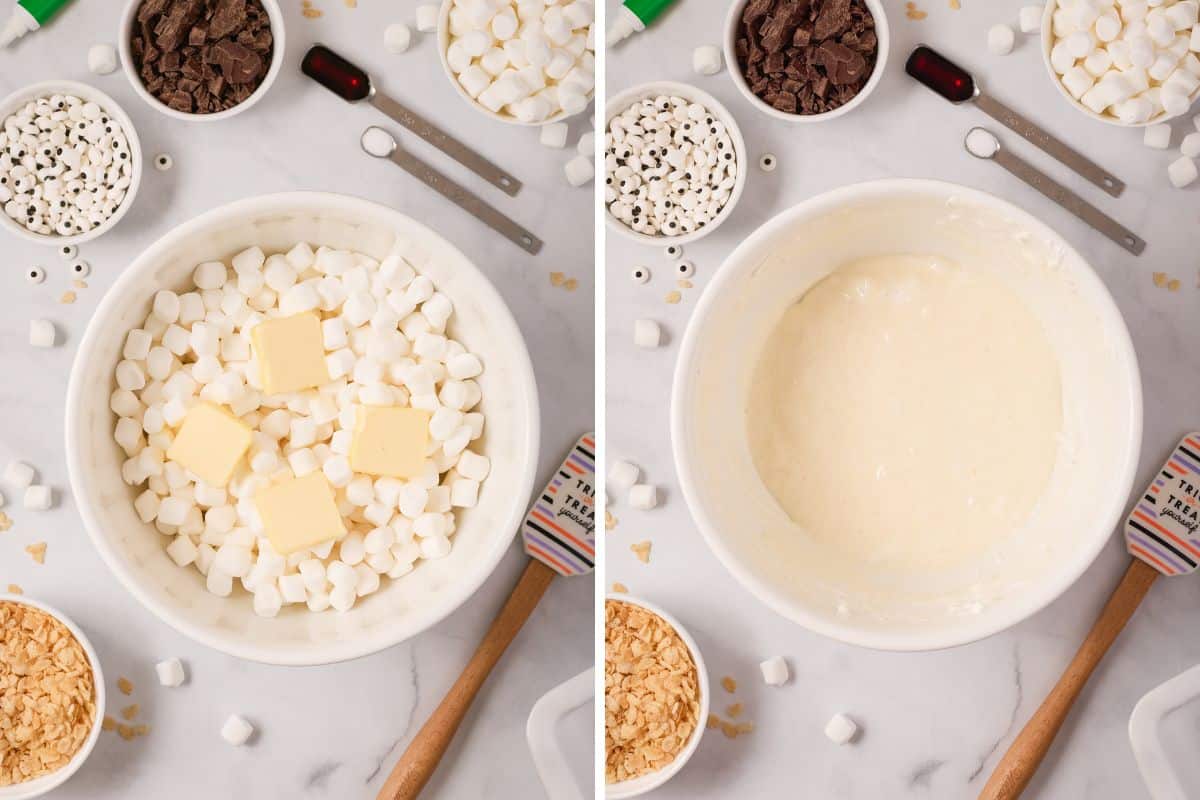
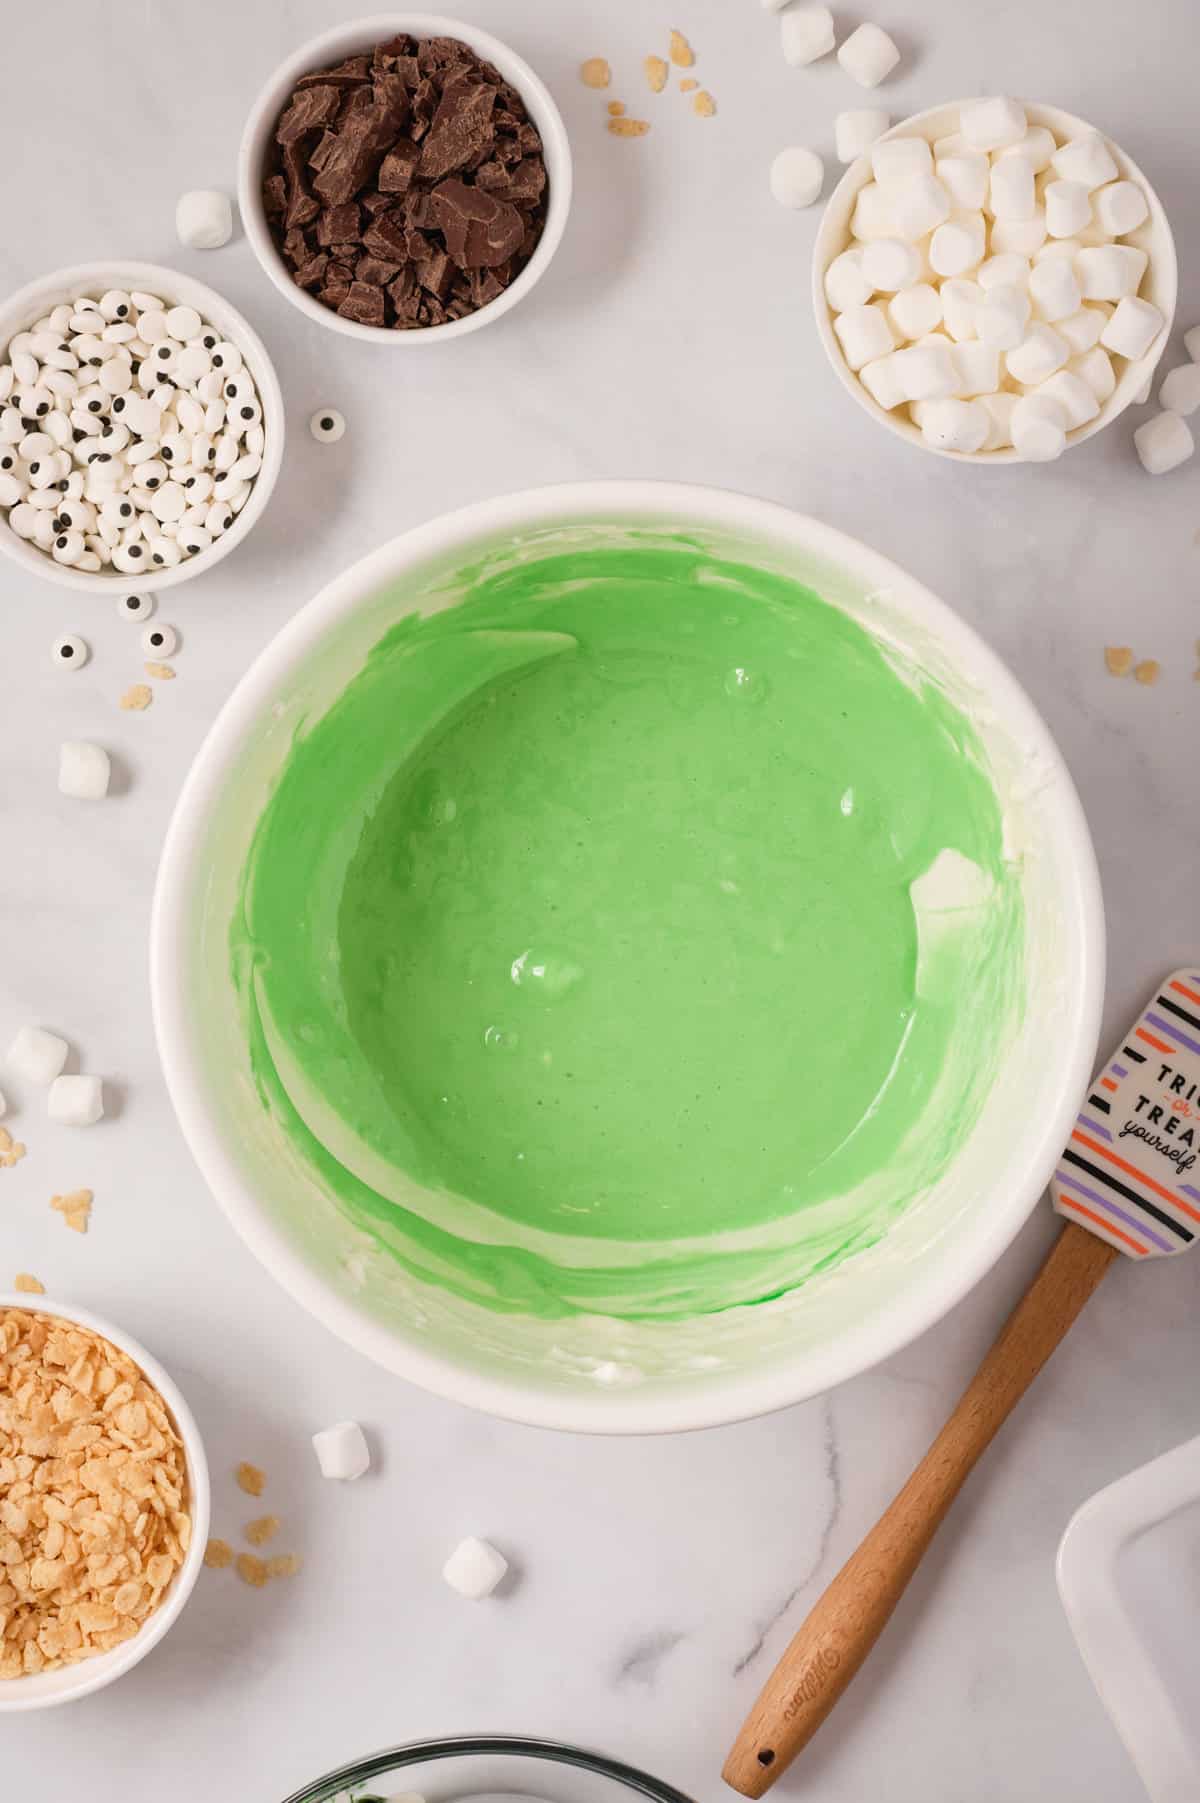
Step 3: Once you have a smooth buttery marshmallow mixture, add the vanilla, salt, and green food coloring. Add additional food coloring to reach your desired shade of green. Stir until the gooey mixture is a cohesive green color.
Pro tip: Make sure to scrape against the sides and bottom of the mixing bowl when adding the food coloring to the marshmallows. Streaks of food coloring can hide if not fully incorporated.
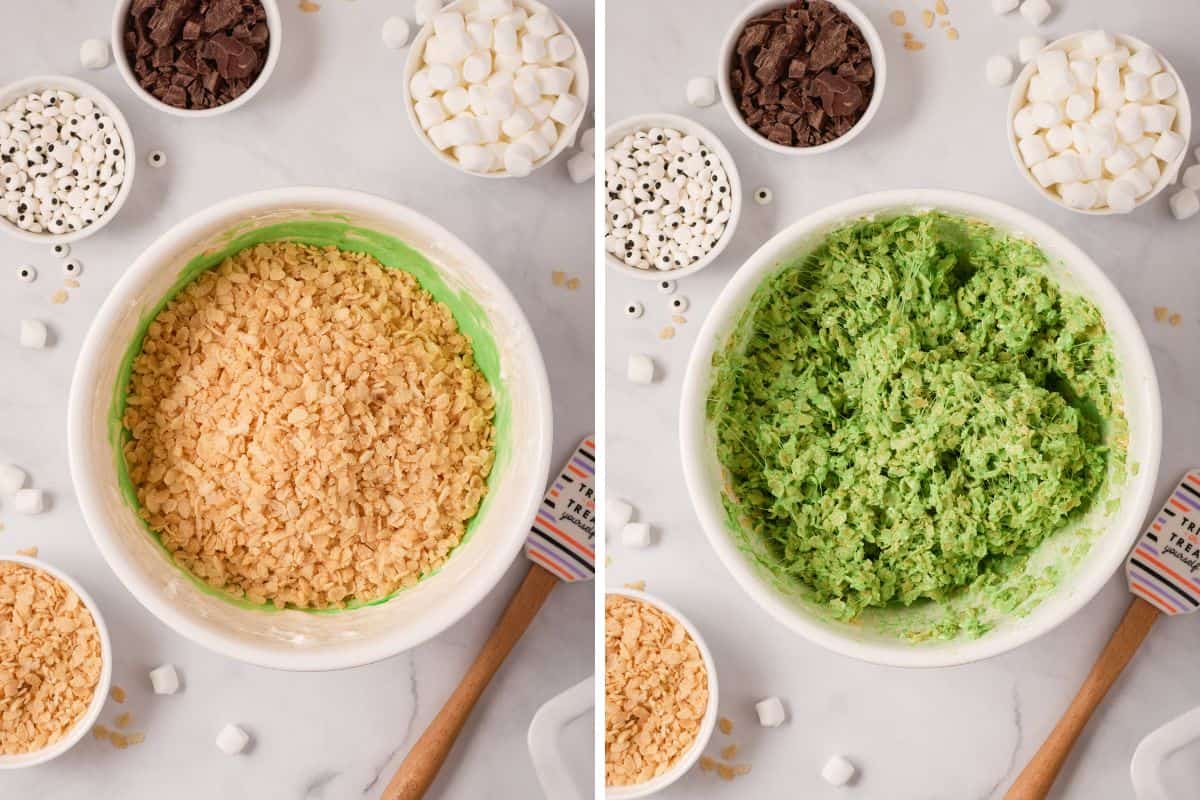
Step 4: Stir the rice cereal into the marshmallow mixture until well combined.
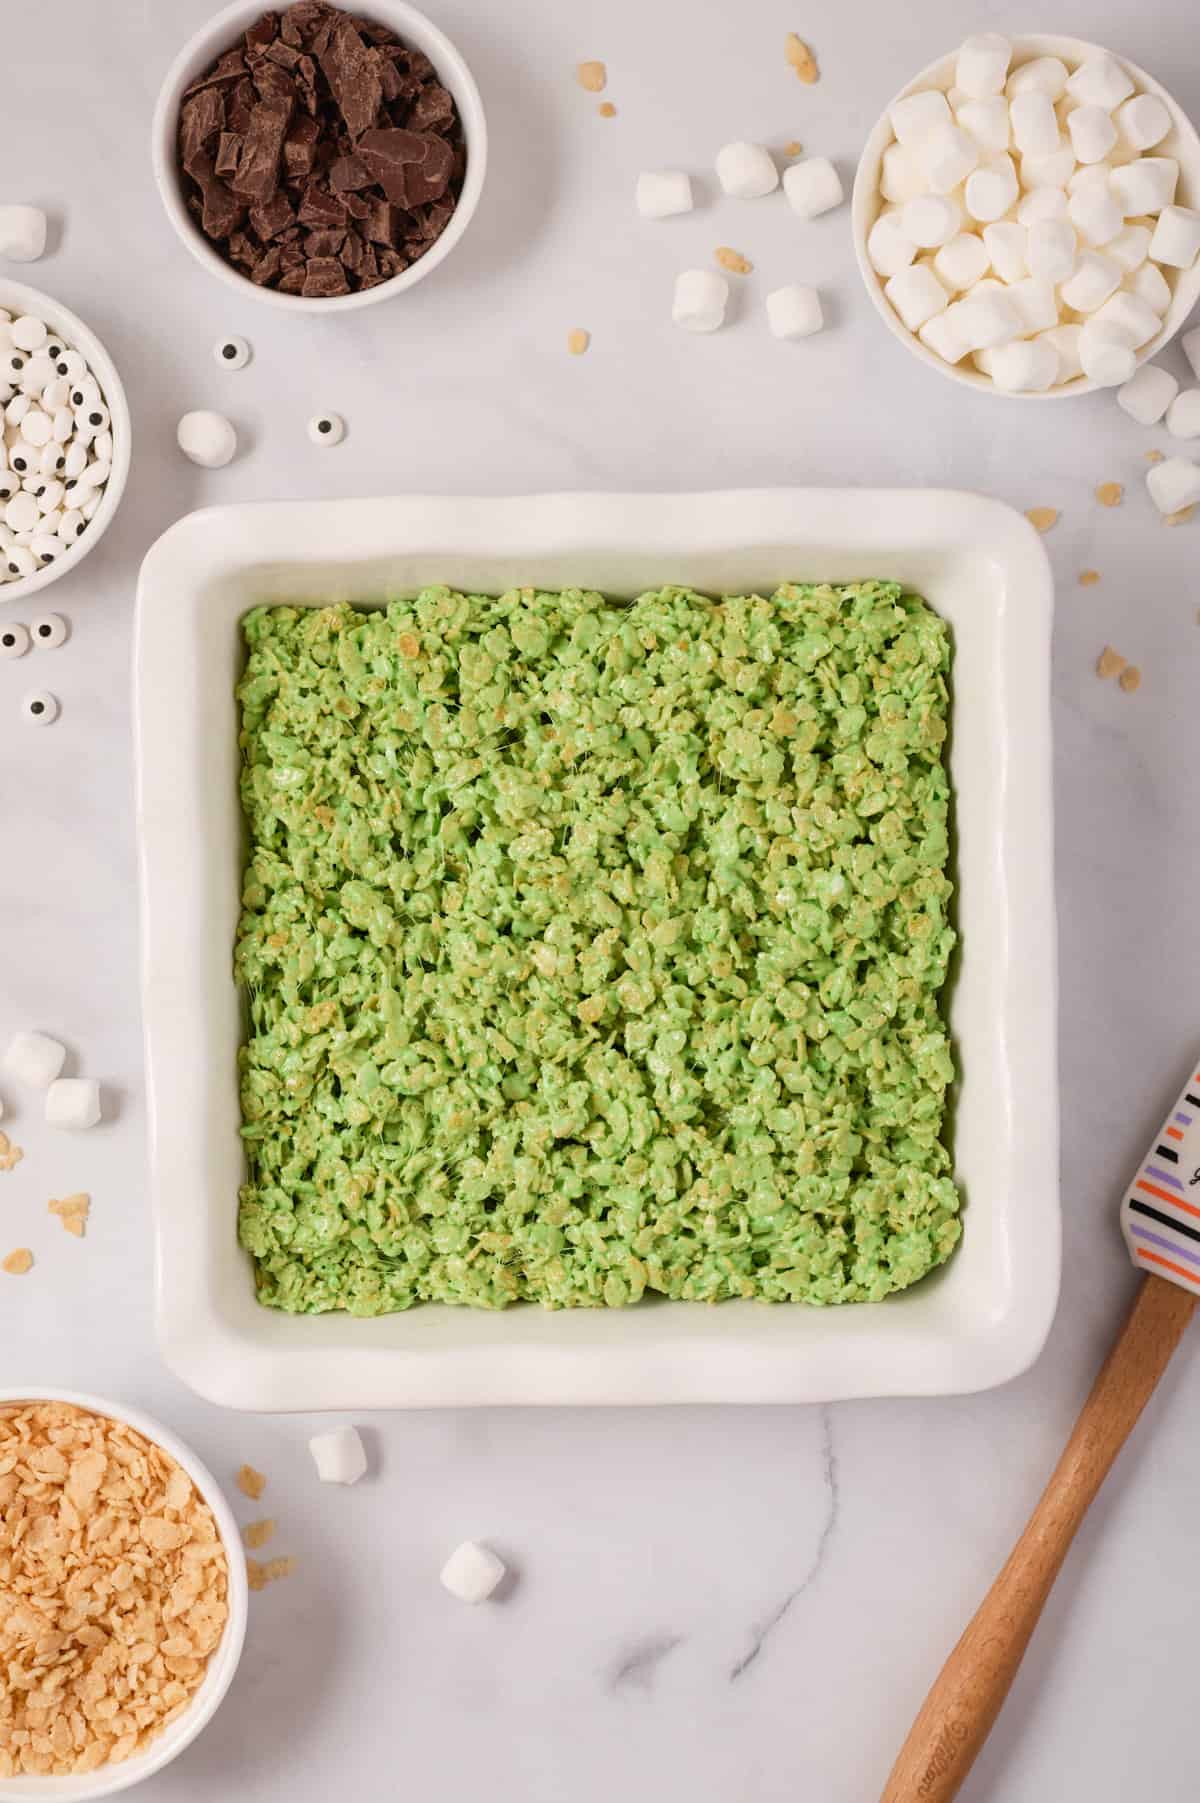
Step 5: Using a spatula, transfer the green marshmallow mixture to the prepared pan and gently press into an even layer.
Pro tip: It’s easier to get the gooey marshmallow mixture off the sides of the mixing bowl with a rubber spatula, but a spoon can be used as well.
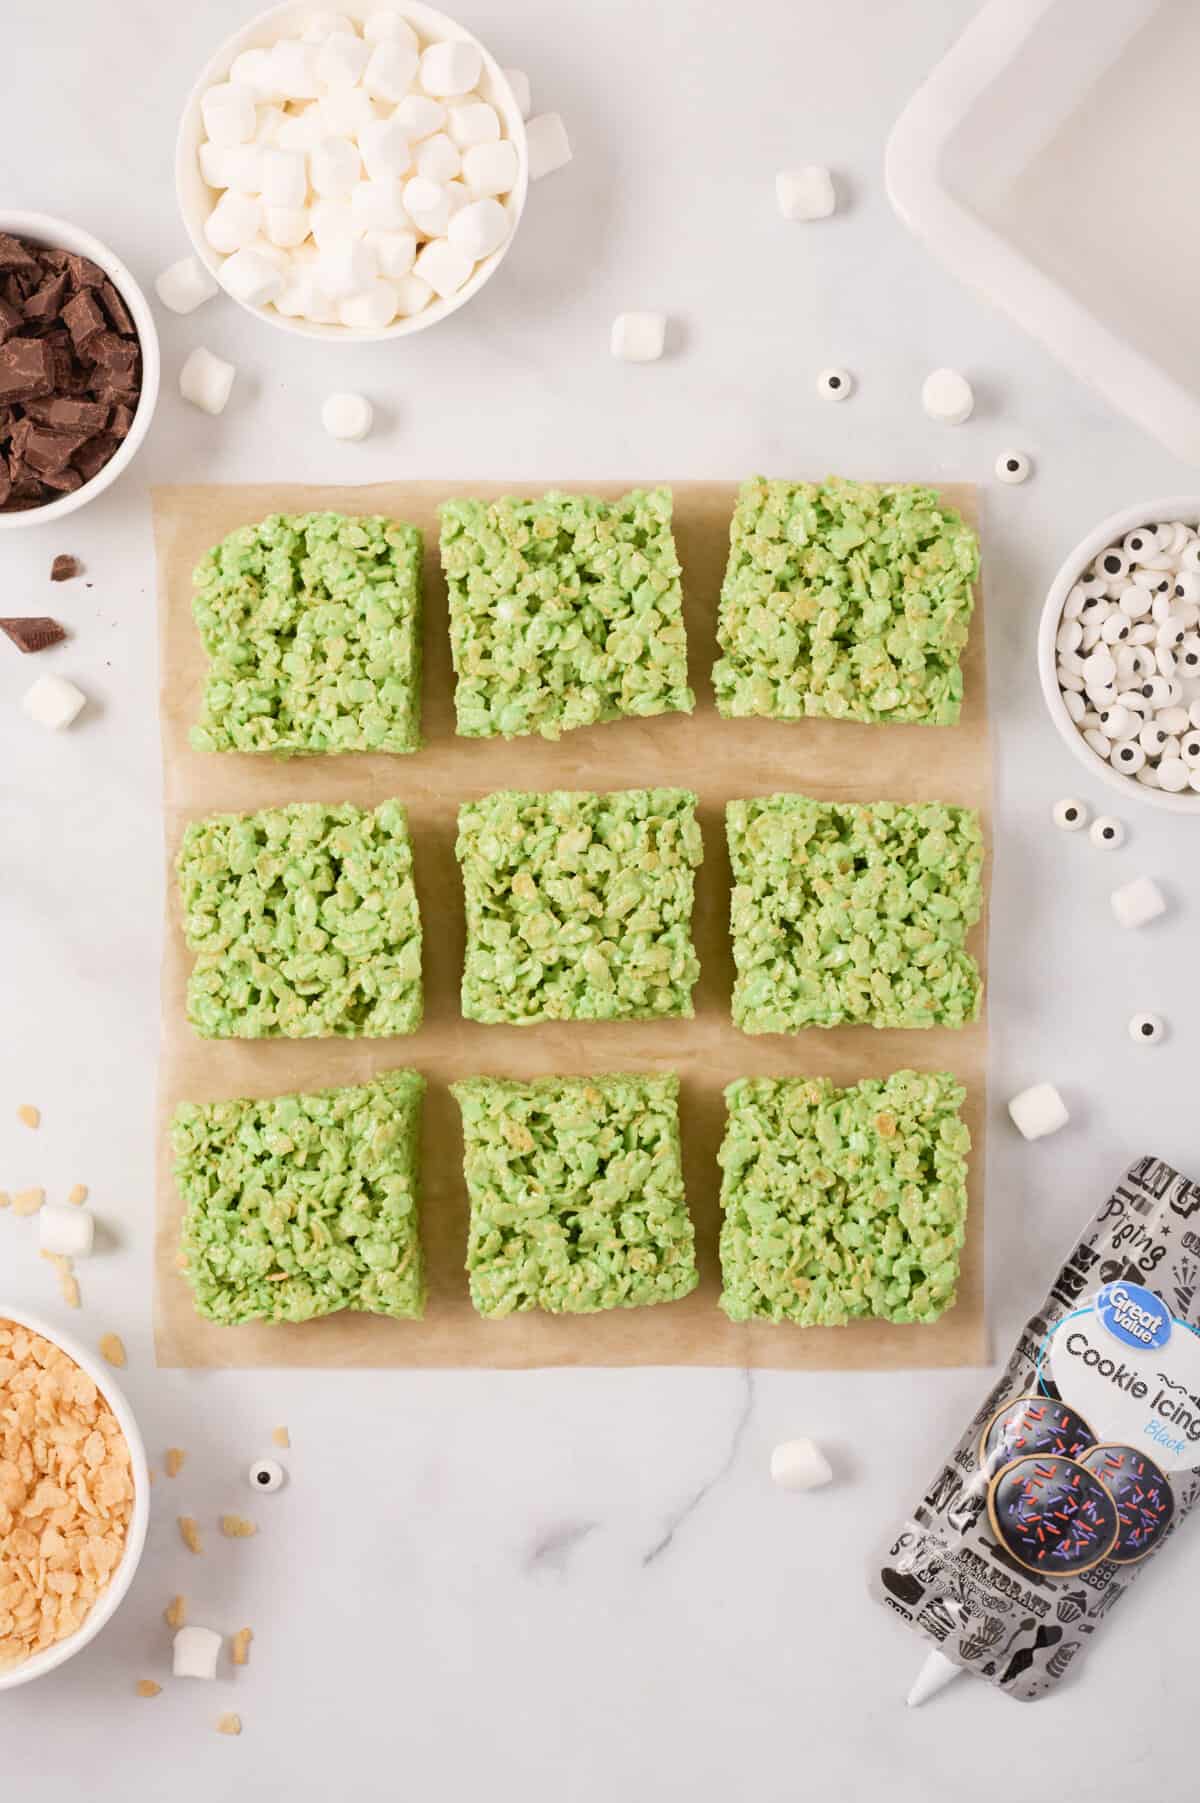
Step 6: Allow the rice krispies treats to set in the pan for 1-3 hours. Once they’ve cooled and firmed up, slice the treats into 9 equal squares.
Pro tip: You can cut the rice cereal treats in the pan or turn them out onto wax/parchment paper or a cutting board before cutting them.
Step 7: Place a piece of parchment paper or wax paper aside to set the rice kripsies on after dipping them in chocolate. Add the chopped chocolate almond bark to a small microwave-safe bowl and melt for one minute. Stir then microwave for another 30 seconds. Stir again until smooth.
Step 8: Dip the top ½ – ¾ inch of each rice krispie square into the melted chocolate to create Frankenstein’s hair. When pulling the treat out of the chocolate, let the chocolate drip off before placing it on the wax paper set aside. Let the chocolate-dipped rice krispies harden on the wax paper.
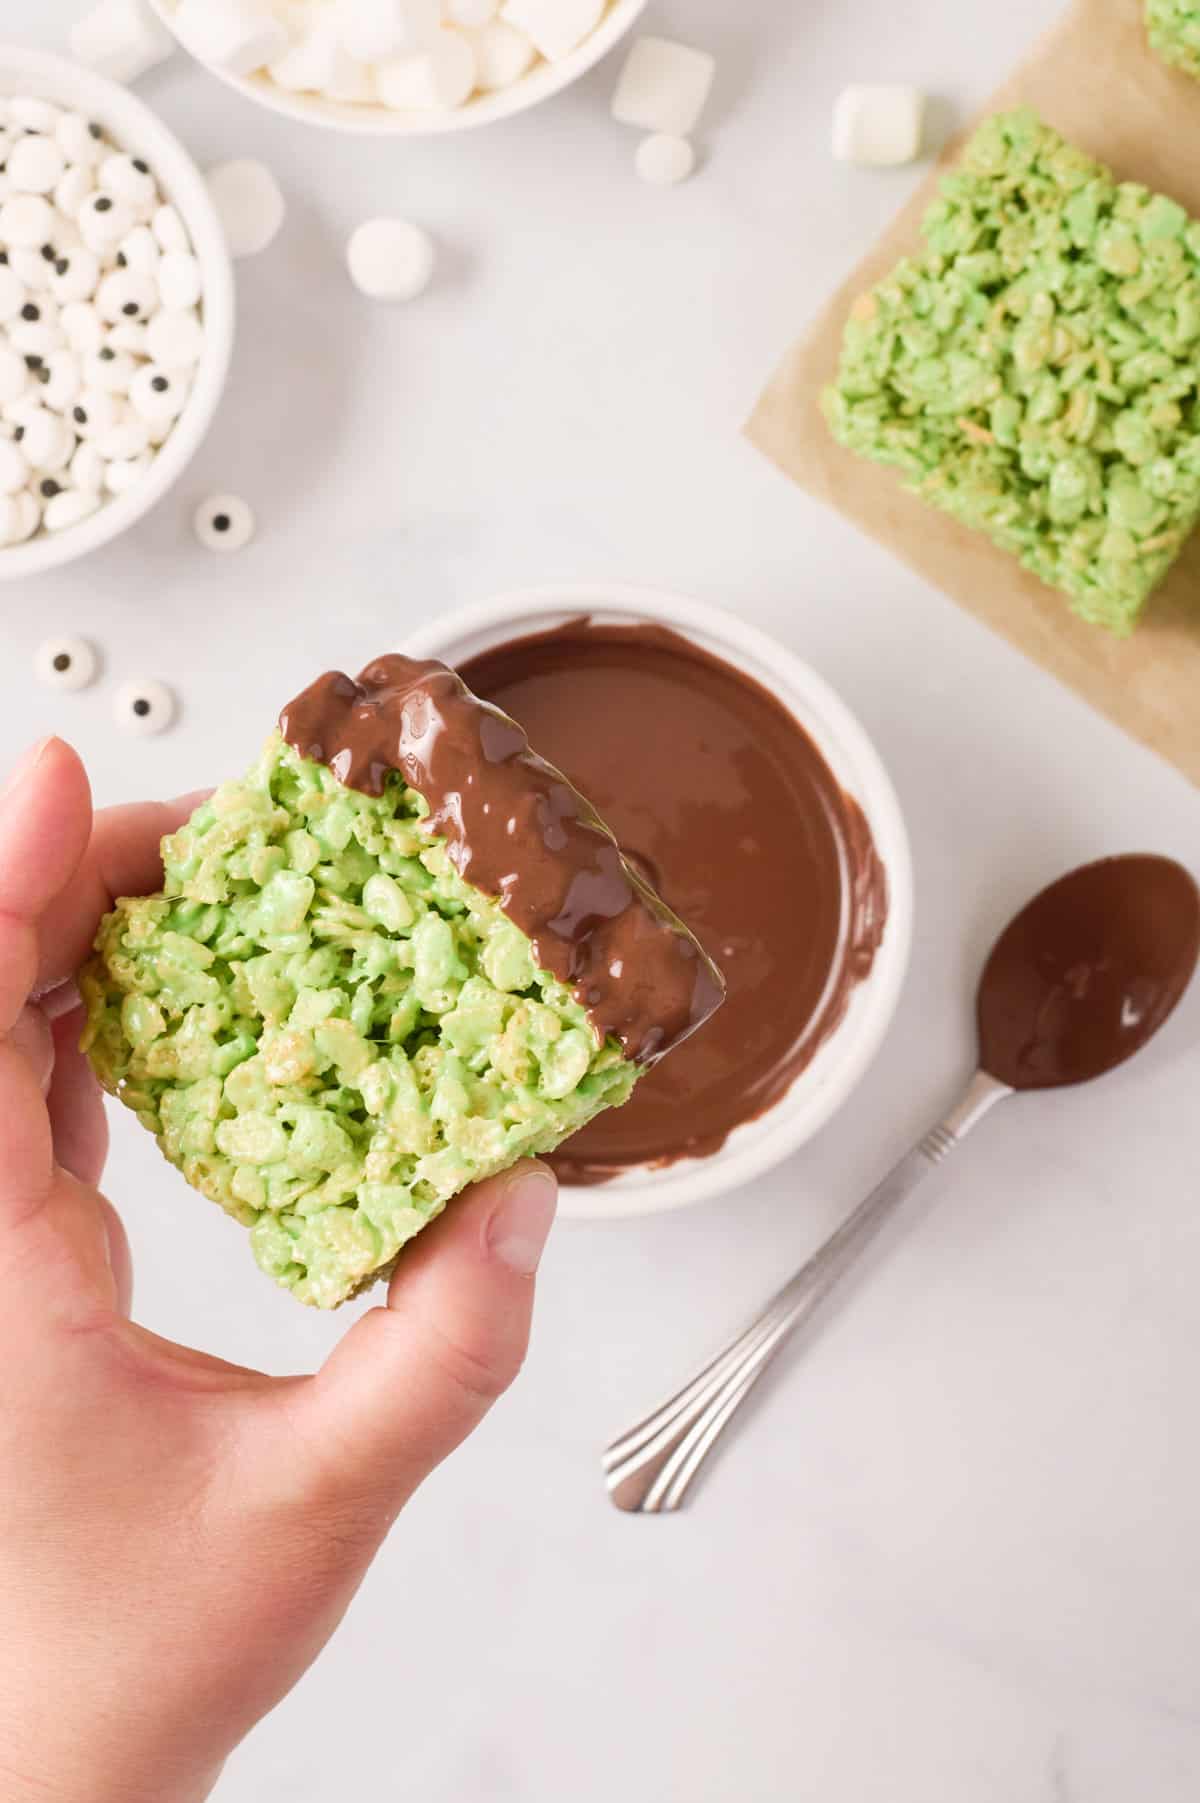
Pro tip: Choose your bowl wisely. Use a bowl large enough to fit the rice krispies squares, but small enough that there’s enough depth created in the bowl to be able to dip the squares in the chocolate. Too large of a bowl will spread the melted chocolate out too much for dipping.
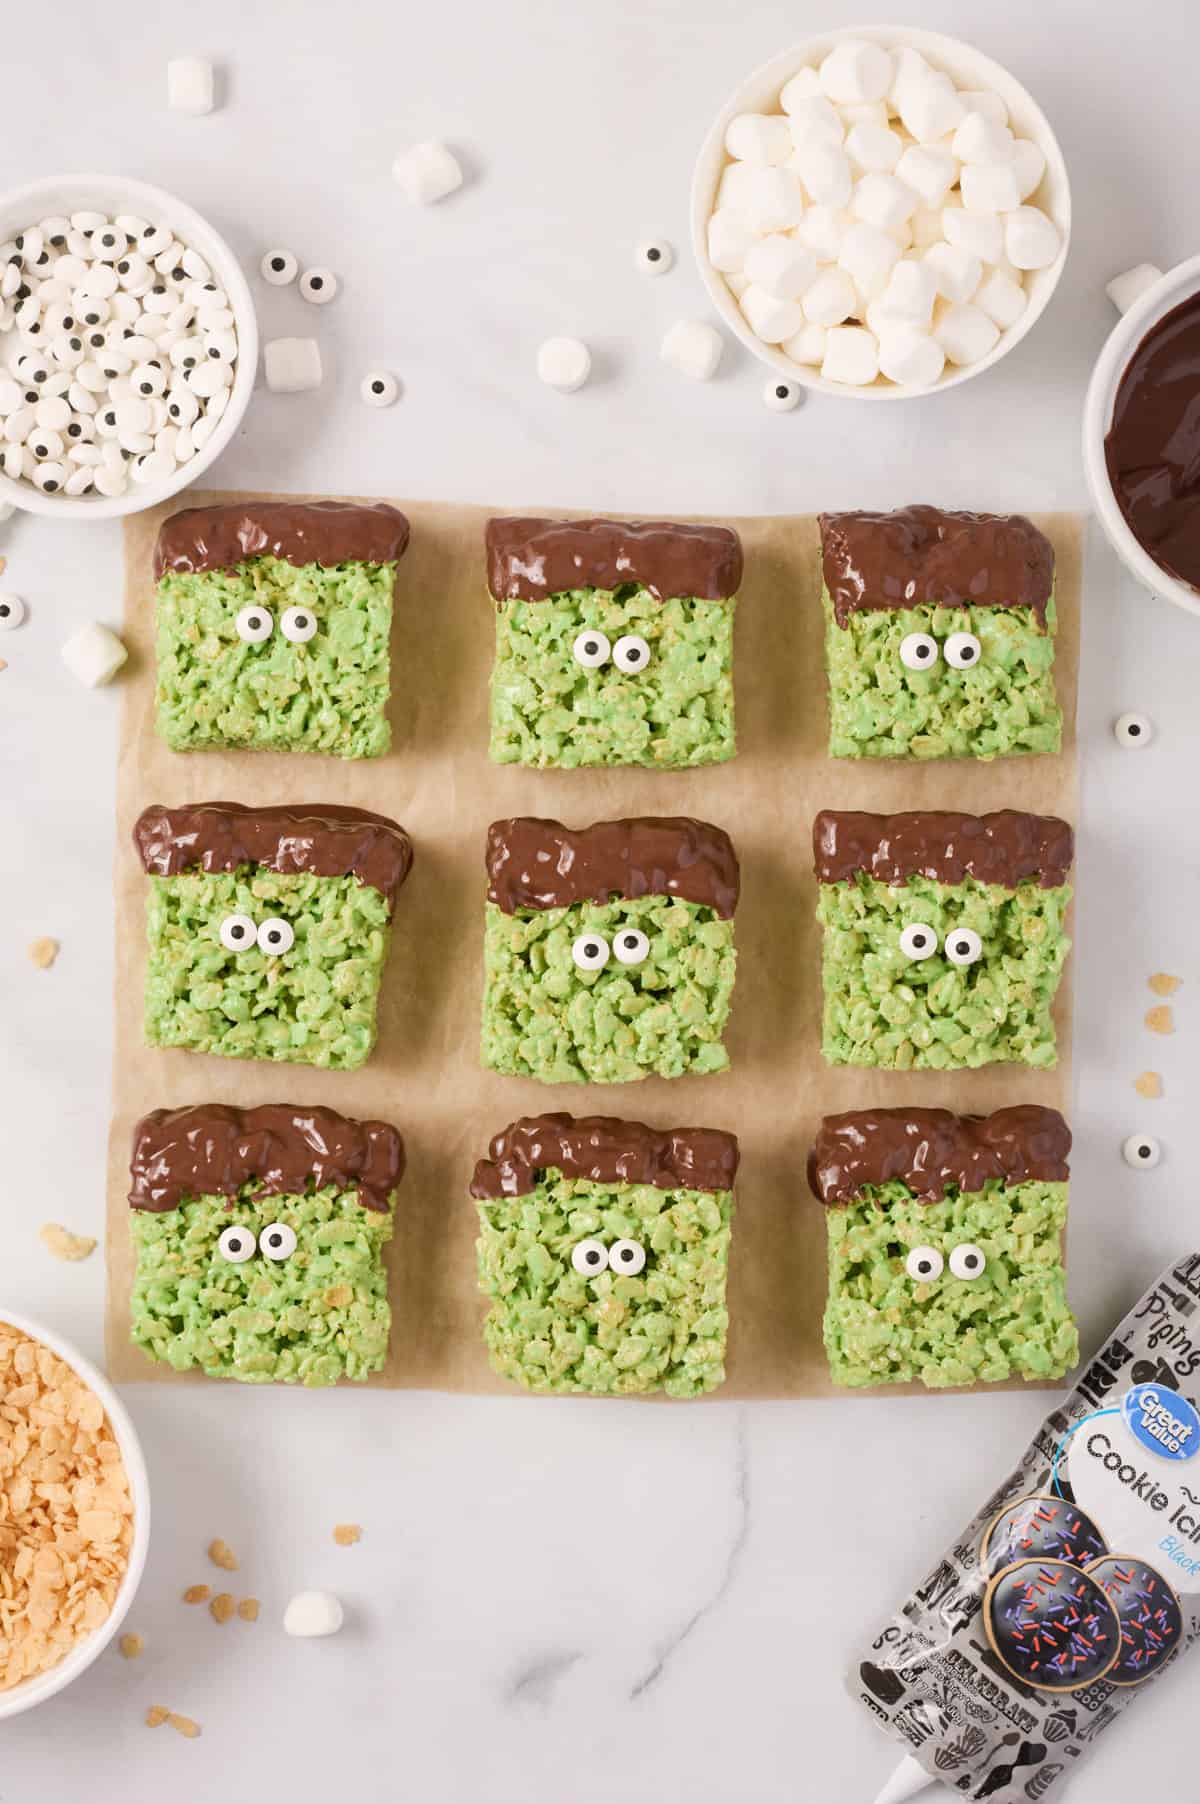
Step 9: Dot the back of each candy eye with black icing and place the candy eyeballs in the center of the face.
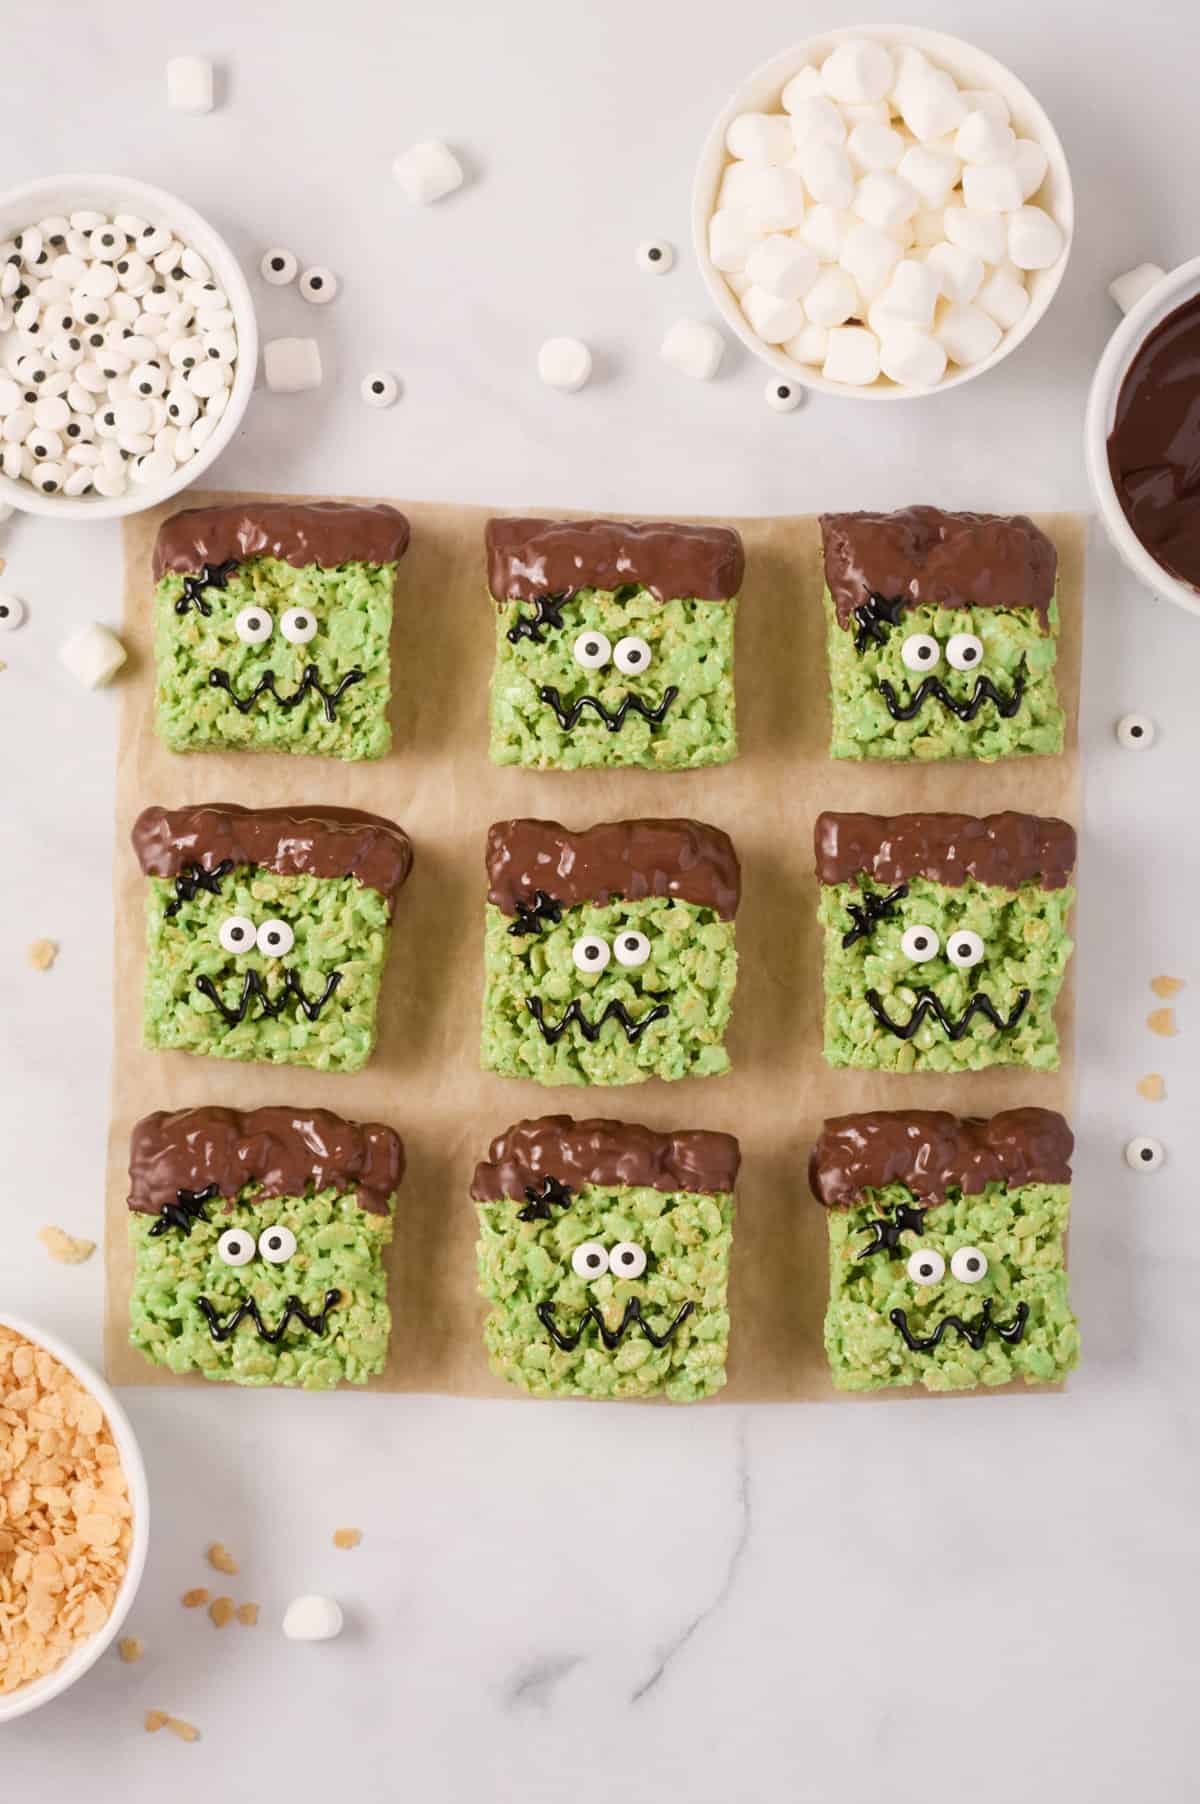
Step 10: Use the icing to draw a mouth and a line of stitches on Frankenstein’s forehead.
Step 11: Place a dot of icing on one of the flat sides of a mini marshmallow and press on the side of the treat to create the bolt going through his neck. Repeat on the other side with another marshmallow.
Pro tip: To help secure the mini marshmallow bolts, press them against the krispy treats with some pressure to get them to stick. The stickiness of the marshmallow treats will work in your favor to help the marshmallows stay in place while the icing dries.
Stovetop instructions
No microwave? No problem. You can make your spooky treats on the stovetop instead of in the microwave.
To make rice krispies treats on the stovetop:
- Add the butter and marshmallows to a dutch oven or large pot over medium-low heat, stirring occasionally. Once the marshmallows have melted stir in the salt, vanilla extract, and green food coloring.
- Remove the pot from heat and add the rice krispie cereal. Mix and the cereal and marshmallows inside the pot until the cereal is all coated.
- Transfer the mixture to the baking pan.
Storage
Although these fun treats are best enjoyed the day they are made, you can store them in an airtight container for up to 3 days.
Expert Tips & Tricks
Microwave time: Microwaves operate at different strengths of power and some need more time than others. If you need more time to melt the marshmallows or chocolate, microwave them at additional 10-second increments, stirring between intervals.
Grease your hands: Coat your hands with non-stick cooking spray or butter before pressing your rice krispies into the pan. This will help to keep the sticky rice cereal mixture from sticking to you. Separating your hands from the sticky cereal with a sheet of parchment or wax paper will work too.
Don’t pack them in too tightly: If you press too hard, the rice krispies will be compact and lose their airy, fluffy texture. Press gently!
Recipe FAQ
Yes, you can use a 8 x 8 baking pan instead of a 9-inch pan for extra thick treats.
Cut into the rice krispies as early as 1 hour after setting in the pan. This is my favorite time to cut (and eat!) them because they’re still so soft and gooey but will hold their shape. For firmer rice crispy treats, wait another hour or two before cutting in.
If you want the brightest green color possible you need Americolor’s Electric green gel food coloring. Their u0022electricu0022 line of colors is amazing!
More Halloween Food Ideas
- Ghosts in the graveyard dessert
- Witch hat cookies
- Hocus pocus punch
- See all my favorite Halloween treat ideas here! 60+ recipes!
Frankenstein Rice Krispie Treats
Ingredients
- 12 ounce package of mini marshmallows + 18 mini marshmallows, divided
- 4 Tablespoons unsalted butter
- 1 teaspoon green gel food coloring
- 1 teaspoon vanilla extract
- ¼ teaspoon salt
- 5 cups rice krispies cereal
- 1 cup chopped chocolate almond bark
- 9 pairs of candy eyes
- Black cookie icing
Instructions
Make Rice Krispie Treats:
- Lightly spray a 9 x 9 pan with non-stick cooking spray and set aside.
- Slice the butter into four equal squares. Add the butter and mini marshmallows to a large microwave-safe bowl and microwave for one and a half minutes. Then, stir until smooth.
- Once you have a smooth buttery marshmallow mixture, add the vanilla, salt, and green food coloring. Stir until the gooey mixture is a cohesive green color.
- Stir the rice cereal into the marshmallow mixture until well-combined.
- Transfer the ceral mixture to the baking pan and gently press into an even layer.
- Allow the rice krispies treats to set in the pan for 1-3 hours.
- Once they’ve cooled and firmed up, slice the treats into 9 equal squares.
Decorate:
- Place a piece of parchment or wax paper aside to set the rice kripsies on after dipping them in chocolate.
- Add the chopped chocolate almond bark to a small microwave-safe bowl and melt for one minute. Stir then microwave for another 30 seconds. Stir again until smooth.
- Dip the top ½ – ¾ inch of each rice krispie square into the melted chocolate to create Frankenstein’s hair. When pulling the rice kripsie out of the chocolate, let the chocolate drip off before placing it on the wax paper set aside. Let the chocolate-dipped rice krispies harden on the wax paper.
- Dot the back of each candy eye with black icing and place the eyes in the center of the face.
- Use the icing to draw a mouth and a line of stitches on Frankenstein's forehead.
- Place a dot of icing on one of the flat sides of a mini marshmallow and press on the side of the treat to create the bolt going through his neck. Repeat on the other side with another marshmallow.
- Repeat until all the treats are fully decorated.
Notes
Nutrition

Did You Make This Recipe?
Share it with me on Instagram @crayonsandcravings and follow on Pinterest @crayonsandcravings for even more!