Easter Bunny Cake
Posts may contain affiliate links, meaning that I may earn a commission if you use a link provided.
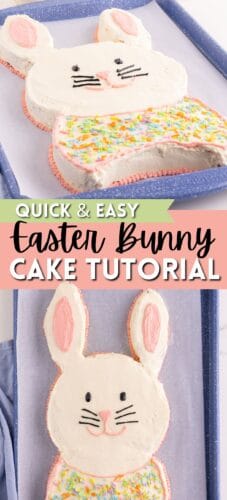
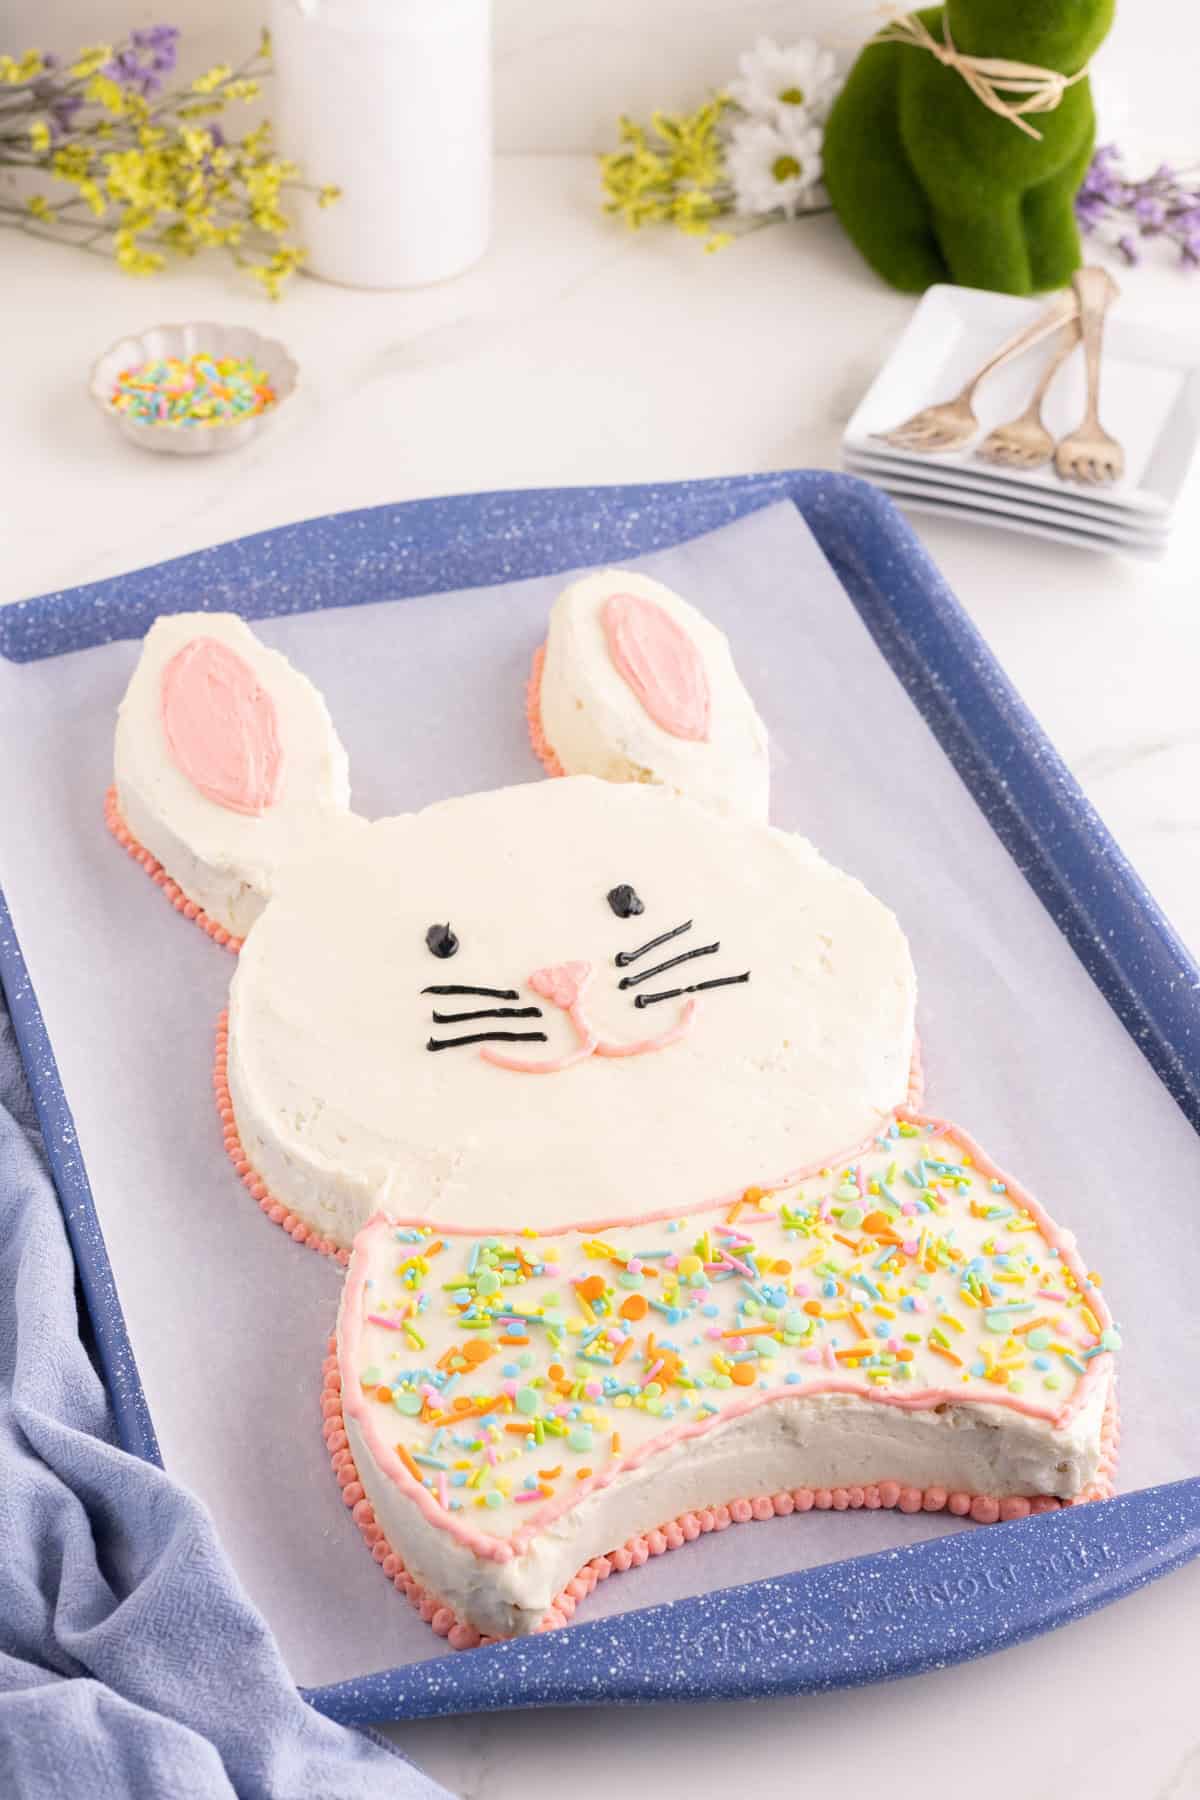
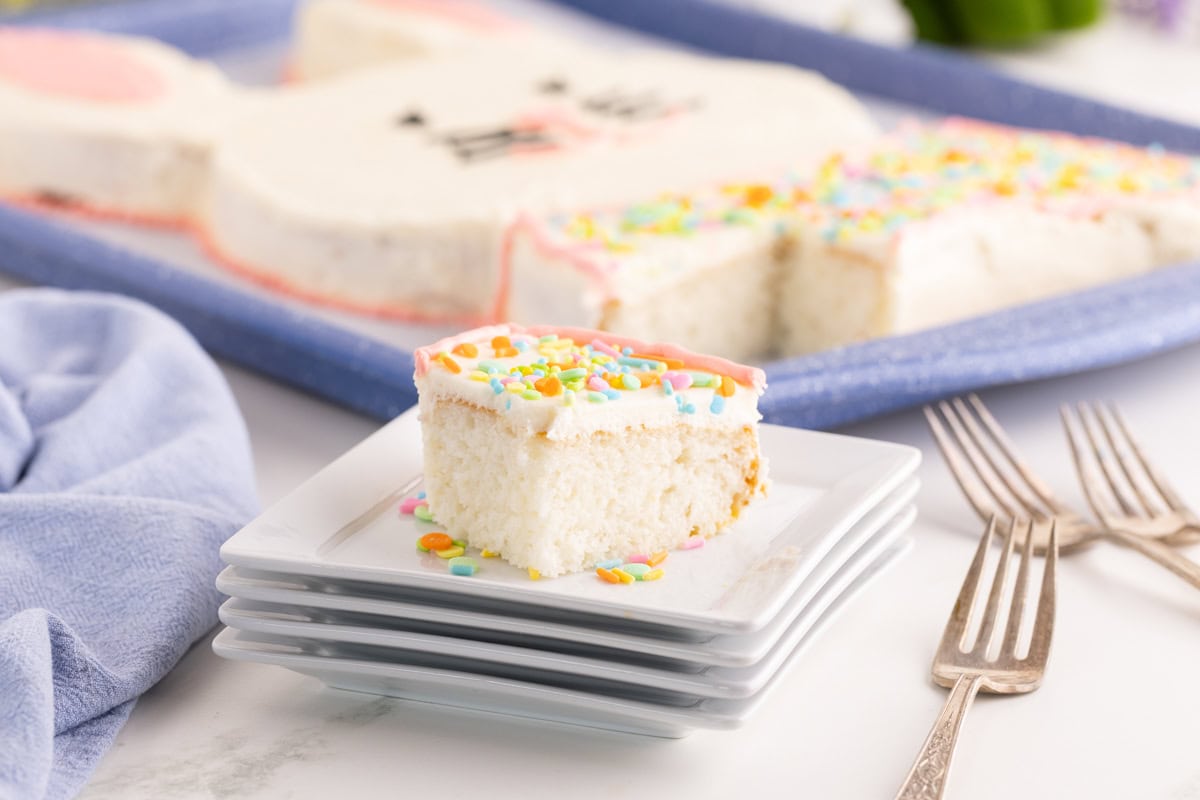
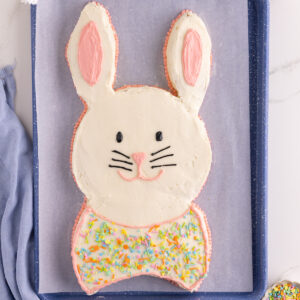
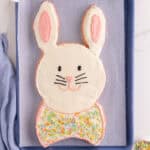
Make an adorable Easter bunny cake using a simple white cake mix, homemade buttercream frosting, and easy step-by-step decorating. This festive Easter dessert looks impressive but is surprisingly simple to create at home.
This Easter bunny cake is just about the sweetest showstopper of a dessert and is one of many cute Easter desserts I’ve shared. It starts with a simple box cake mix, giving you a time-saving shortcut before the fun decorating begins.
It looks impressive and tastes even better, but the step-by-step instructions make it completely manageable. Even beginner bakers can create this bunny Easter cake with confidence.
It’s a fun and festive cake that’s sure to bring as many smiles as my Bunny Butt Oreo balls and my bunny pancakes. Set it out for dessert, and watch it quickly become the highlight of your Easter celebration.
Why you’ll love this recipe
- The perfect Easter party dessert that instantly grabs attention.
- The decorating looks impressive but is simple to follow step by step.
- Starts with a box cake mix to save time and effort.
- A fun baking project to make with kids.
- No special cake pans or fancy tools required.
- Easy to customize with different cake flavors and frosting colors.
Ingredients for Easter Rabbit Cake
This section includes ingredient notes and substitution options. Get all measurements, ingredients, and instructions in the printable recipe card at the end of this post.
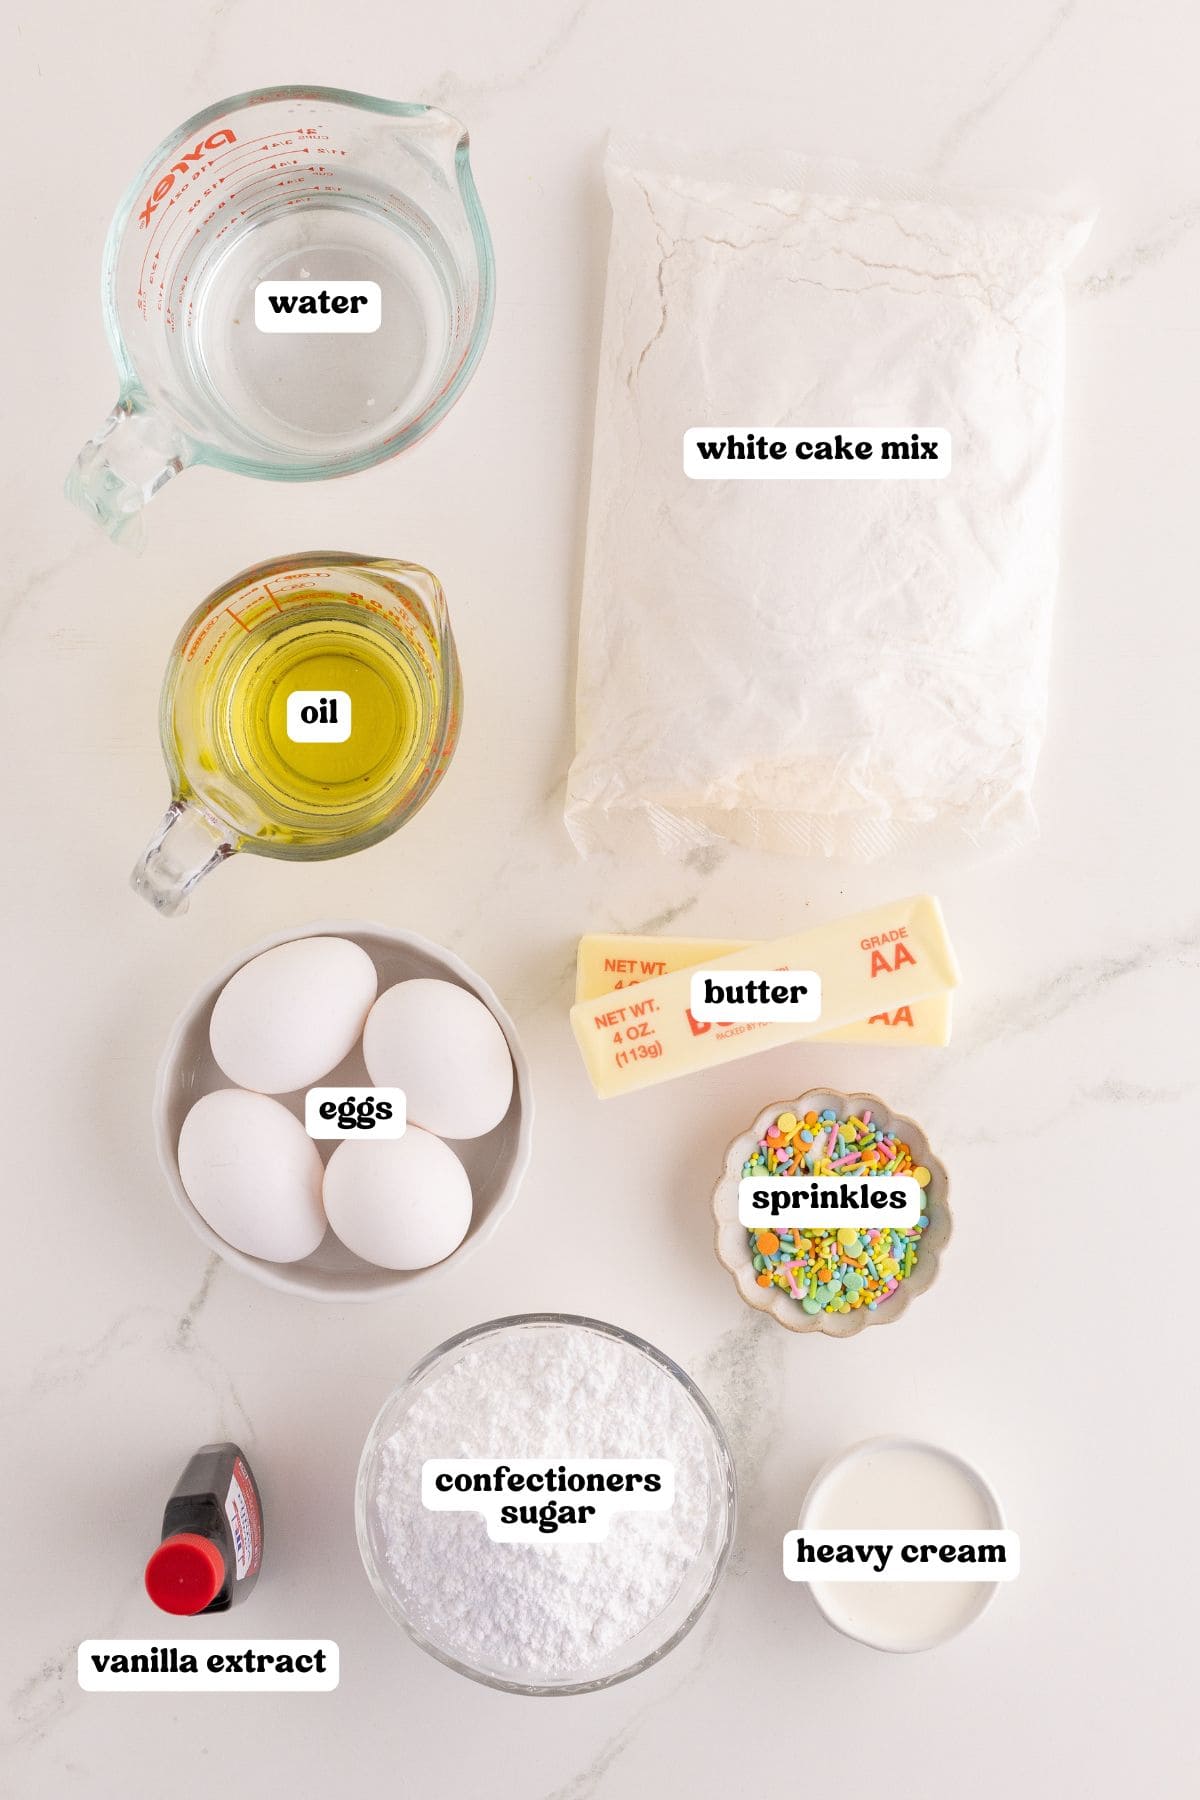
- White cake mix, egg whites, water, and oil – The ingredients listed on the back of the box needed to bake the cake. Using only egg whites keeps the cake bright white. Whole eggs will give it a slightly yellow tint.
- Butter and confectioners sugar – Bring the butter to room temperature for about 40 minutes ahead of time so it creams easily for a smooth buttercream.
- Heavy cream and vanilla extract – The heavy cream thins out the frosting while still keeping it rich and creamy.
- Cake decorating – Pink food coloring, black food coloring, sprinkles, or candy. I prefer to use gel food coloring as it has a wider variety of colors to choose from, and is a bit more concentrated and vibrant.
How to Make Bunny Rabbit Cake
This section shows you how to make the recipe with step-by-step photos and instructions. For the full printable recipe, see the recipe card below.
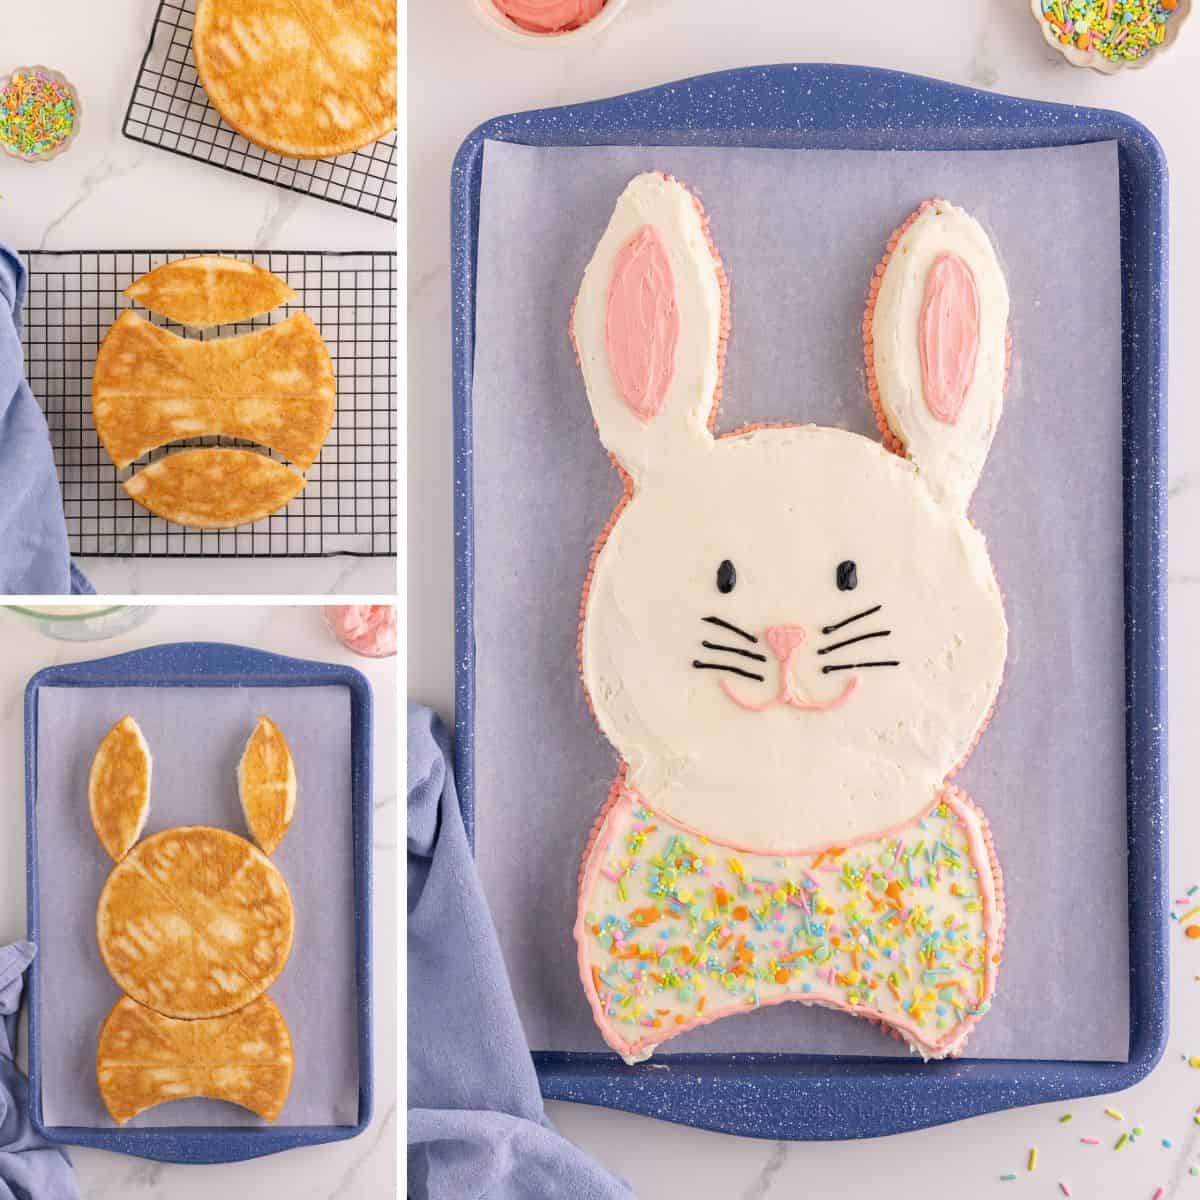
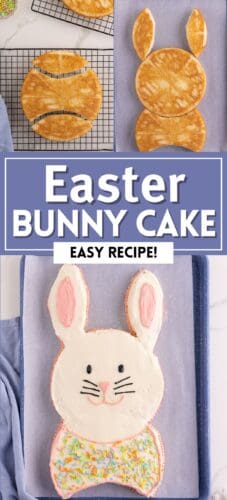
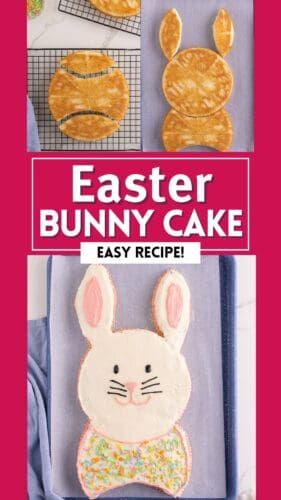
Step 1: Prepare and bake two round cakes according to package directions (9-inch or 8-inch cake pans work), then cool completely.
Step 2: Beat the butter, powdered sugar, vanilla, and cream until smooth and spreadable.
Step 3: Set aside small portions of frosting and color them pink and black for decorating details.
Step 4: Trim one cake to create the bunny ears and bow tie, leaving the second cake whole for the bunny head.
Pro Tip:
Don’t worry if the ears aren’t perfectly even. Frosting hides a lot!
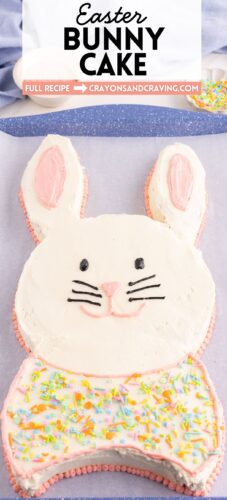
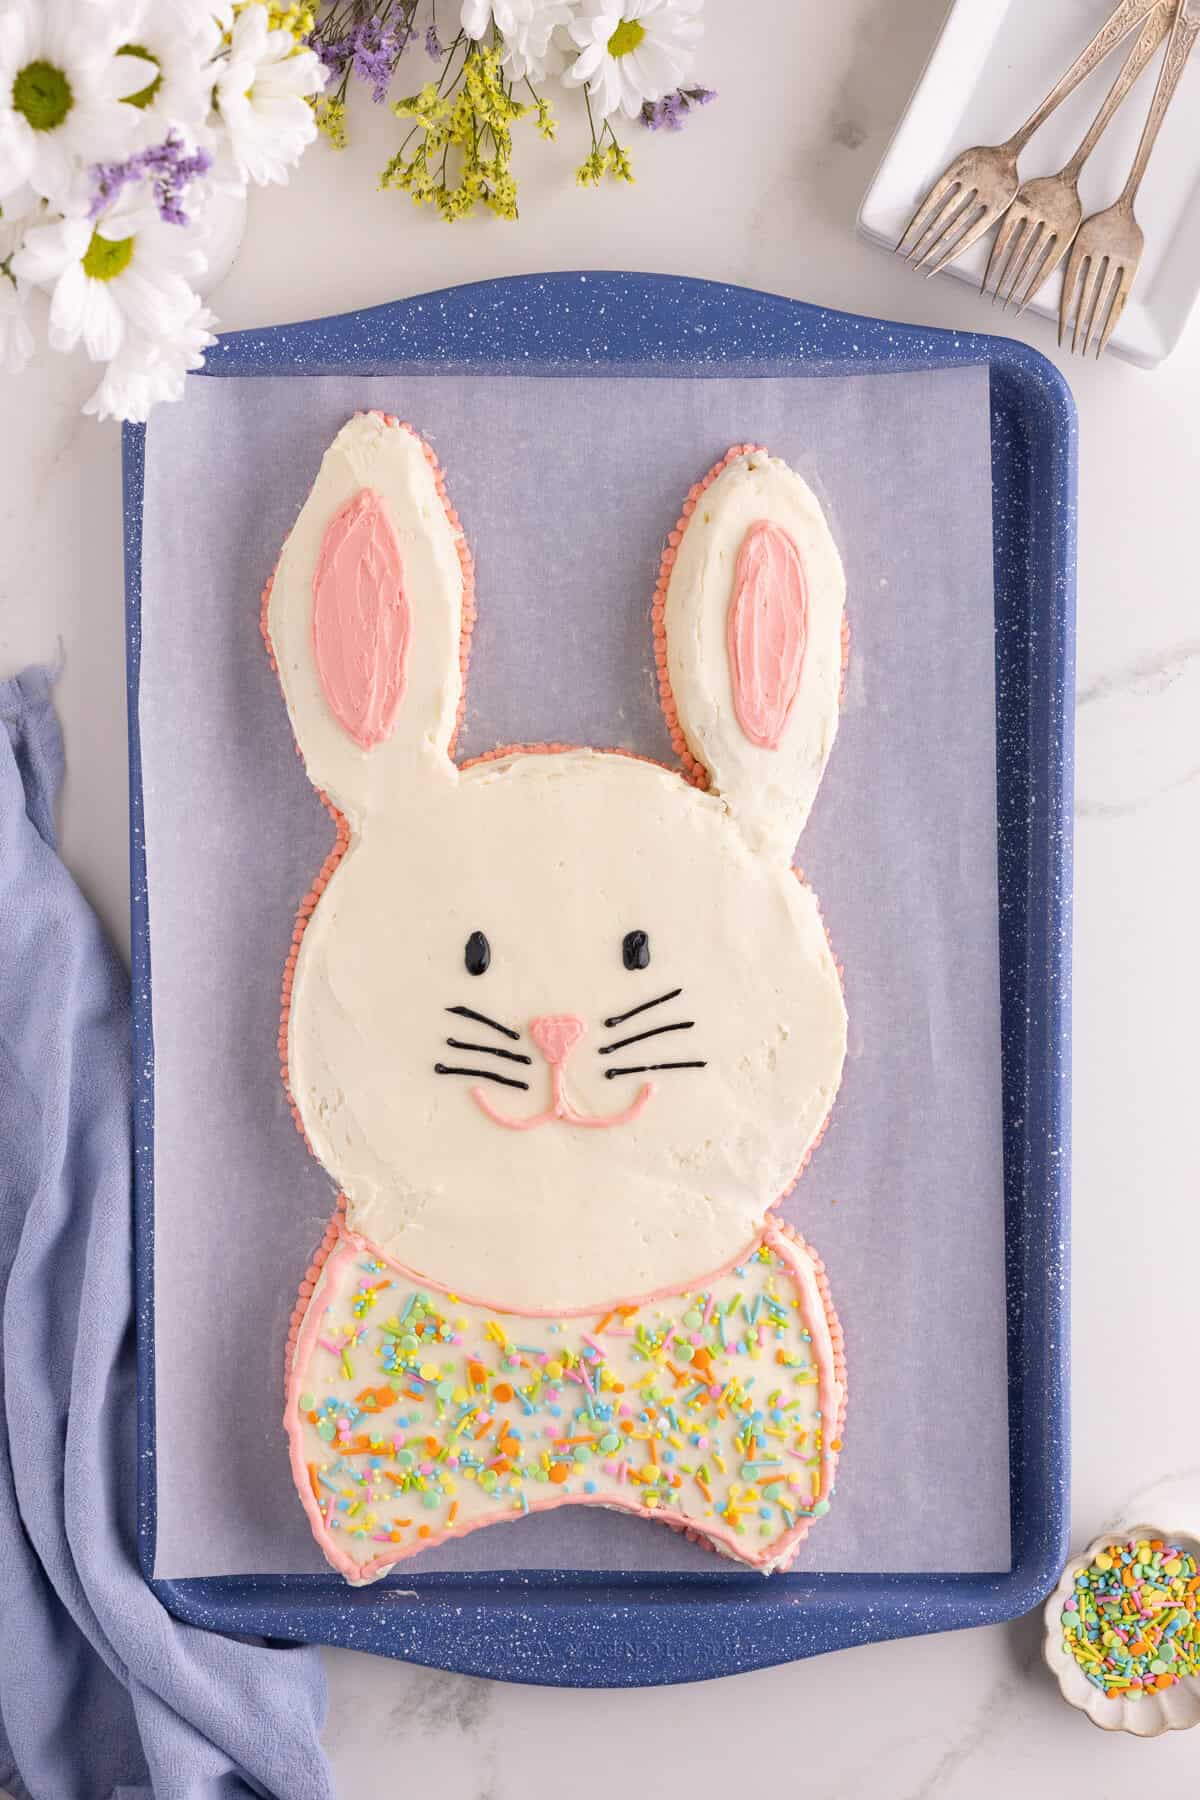
Step 5: Arrange the ears on the top of the cake, frost everything, then pipe on the facial features and finish with optional sprinkles or coconut.
Storage
Refrigerator: Store your Easter bunny cake at room temperature for up to 3 days or in the fridge for up to 5 days. Make sure it’s covered to prevent it from drying out.
Freezer: Any leftover pieces of cake can be kept frozen. Wrap them in plastic wrap and transfer them to a freezer bag. Keep frozen for up to 2 months and then thaw in the fridge overnight when you want a piece.
Make Ahead: Bake the cakes up to 24 hours in advance. Wrap cooled cakes tightly in plastic wrap and store at room temperature. Decorate the next day.
Recipe Tips
- Line pans with parchment paper for easy removal.
- Use clear vanilla extract to keep the frosting bright white.
- Cool cakes completely before frosting to prevent crumbs and melting.
- Use a serrated knife to trim the cake pieces for smoother, cleaner cuts.
- Apply a thin crumb coat first, then add a second smooth layer of frosting.
- Use a small offset spatula or spoon to smooth the piped frosting.
- Bake cakes a day ahead to save time on decorating day.
- Don’t stress the details. Cake decorating can take some practice!
Additions and variations
- Swap the decorations. Use candy eyes or pink and black jelly beans for the eyes and mouth. Whiskers can be made from strips of gummy candy or licorice.
- Add coconut flakes. Turn it into a coconut bunny cake by using shredded coconut to cover the head and ears for a furry appearance.
- Use more colors. I like to use light pink for the nose and ears, but you can use a variety of colors for the bow. You can also completely switch up the colors. Any green, blue, or yellow pastel colors would make a cute bunny.
- Try a different cake flavor. Vanilla, chocolate, spiced cake, birthday cake, funfetti, you name it.
More Easter Desserts
Easter Bunny Cake
Equipment
- 2 small round piping tip such as #3
- large baking sheet or cutting board, for serving
Ingredients
- 1 (15.25-ounce) white cake mix
- 4 egg whites, or as per cake mix directions
- 1 cup water, or as per cake mix directions
- ½ cup vegetable oil, or as per cake mix directions
Buttercream
- 1 cup butter, room temperature
- 5 cups confectioners sugar
- 4-5 Tablespoons heavy cream
- 2 teaspoons vanilla extract
Decorating
- pink food coloring
- black food coloring
- sprinkles or candy, optional
Instructions
Bake cakes
- Preheat oven to 350°F (or according to cake mix directions). Spray two 9-inch or 8-inch round cake pans with nonstick spray and line with parchment.
- Prepare the cake mix according to package instructions, dividing the batter evenly between the pans.
- Bake as instructed on the box. Allow the cakes to cool in pans for 10 minutes, then turn out onto wire racks and allow to cool completely (45–60 minutes).
Make buttercream
- In a bowl of a stand mixer fitted with the paddle attachment, or in a large mixing bowl using a hand mixer, beat butter until creamy and pale, about 3–4 minutes.
- With the mixer on low speed, gradually add the sugar and mix on low until combined, scraping the bowl as needed. Increase speed to medium and beat until thick and well combined.
- Add vanilla and 3 Tablespoons cream. Beat until smooth, adding more cream 1 Tbsp at a time until the frosting reaches a spreadable consistency.
Color frosting
- Remove ½ cup frosting and use food coloring to dye pink. Transfer to a piping bag fitted with a small round tip.
- Remove 2 Tablespoons of frosting, color black, and transfer to a separate piping bag with a small round tip.
Cut cake pieces
- Place one cake on a cutting board. Using the cake pan as a guide, position it about 2½ inches from the edge and use a serrated knife to cut a half-circle to form one ear. Repeat on the opposite side for the second ear.
- The remaining center piece will form the bow tie. The second cake stays whole for the bunny's face.
Assemble & decorate
- Arrange the cake pieces on a large baking sheet or cutting board: whole cake for the face, two oval ear pieces, and the bow-tie piece.
- Frost the tops and sides of all cake pieces.
- Pipe pink frosting inside the ears, for the nose, mouth, and bow-tie outline. Smooth with a spoon or small offset spatula. Use remaining pink frosting to fill or border the bow tie.
- Pipe eyes and whiskers with black frosting. Decorate the bow tie with sprinkles or candy if desired.
Notes
Nutrition
Did You Make This Recipe?
Share it with me on Instagram @crayonsandcravings and follow on Pinterest @crayonsandcravings for even more!