

Chip the Teacup Dessert
Posts may contain affiliate links, meaning that I may earn a commission if you use a link provided.
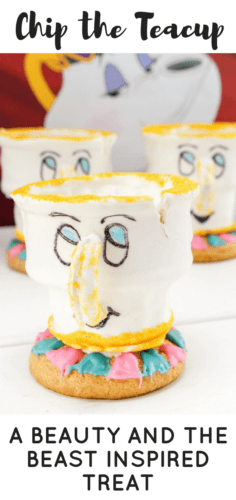
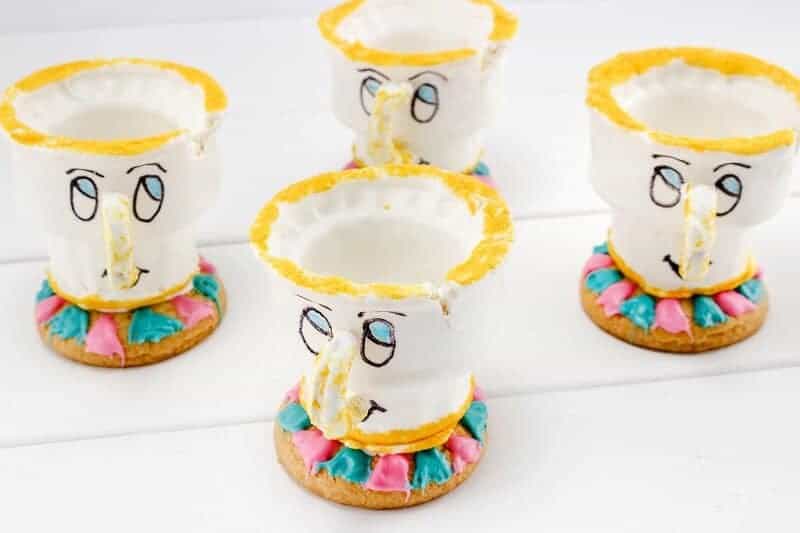
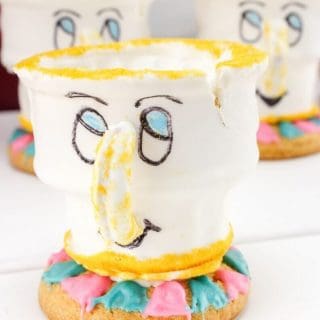
Chip the Teacup is such a sweet character. What better way to honor the iconic Beauty and the Beast character than a super sweet and adorable no-bake teacup treat?
Whether you are looking for Beauty and the Beast themed party snacks or you just love Beauty and the Beast, you are going to adore this adorable, edible Chip teacup craft.
Chip the Teacup is such a sweet character. What better way to honor the character than a super sweet treat? Not only is this treat delicious, but with a few decorating skills, you can make it look like this iconic character.
Best of all, it’s something you can work on with your kids. They will love trying their hand at decorating these yummy treats to look just like Chip the Teacup from Beauty and the Beast.
You may want to practice doing a few of these on your own so that you can show your kids how to do it. That way your kids are less likely to get frustrated when they try.
Also, don’t be afraid to switch up the ingredients a bit. Using a different type of cookie or using chocolate ice cream cones instead of the regular kind will make the recipe your very own.
Chip the Teacup Ingredients
This section includes ingredient notes and substitution options. Get all measurements, ingredients, and instructions in the printable recipe card at the end of this post.
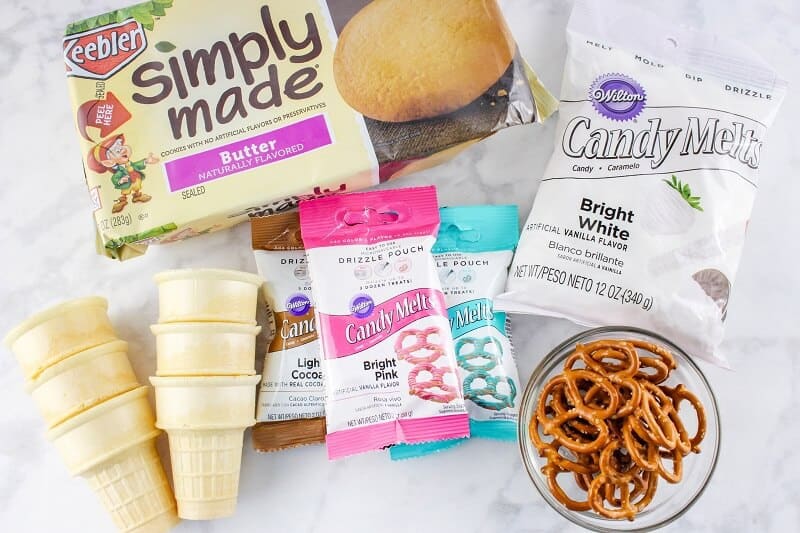
- Keebler Simply Made Butter Cookies – or another kind of plain cookies. Homemade works, too.
- Plain Ice Cream Cones
- Wilton Candy Melts, Bright White
- Pretzel twists
- Wilton Candy Drizzle Pouch, Pink and Blue – if you can’t find them, regular pink and blue candy melts can be used along with a piping bag and decorating tips.
- Edible Markers
- Edible Gold Glitter
How to Make Chip the Teacup
This section shows you how to make the recipe with step-by-step photos and instructions. For the full printable recipe, see the recipe card below.
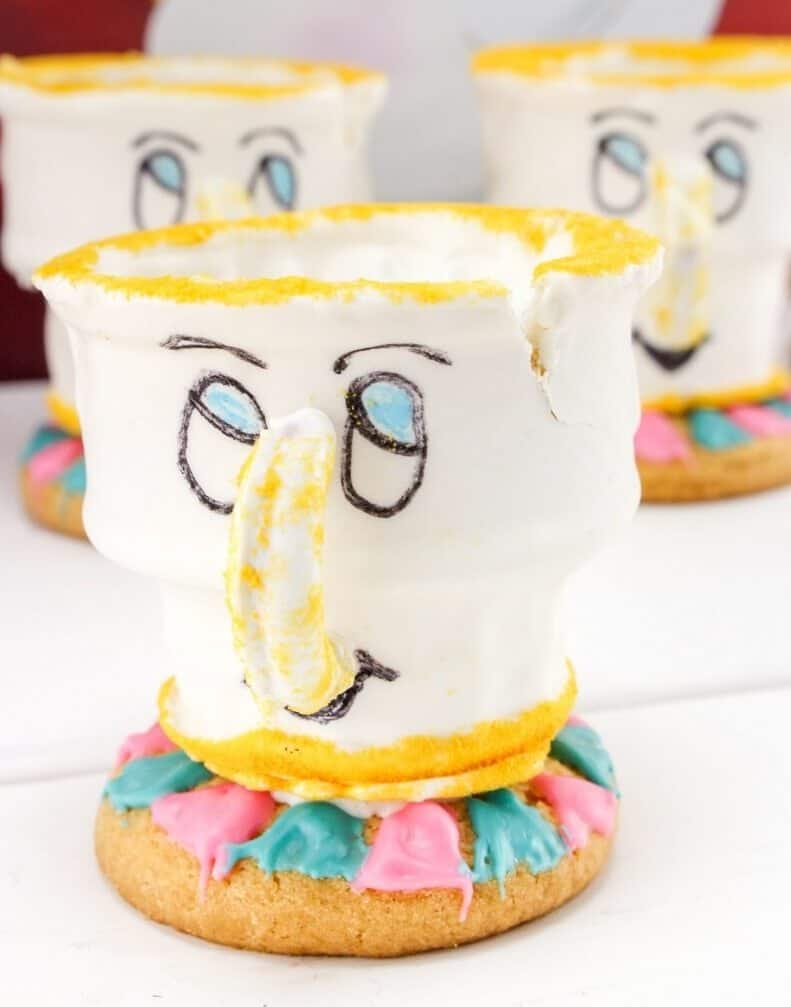
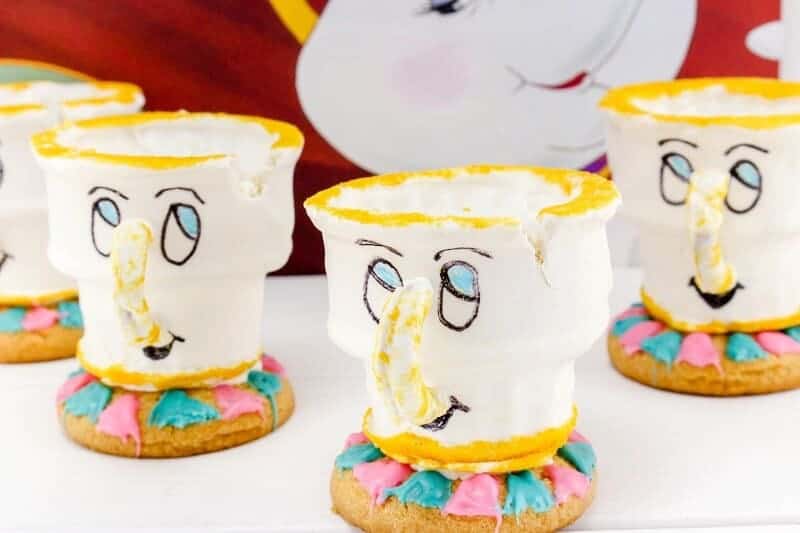
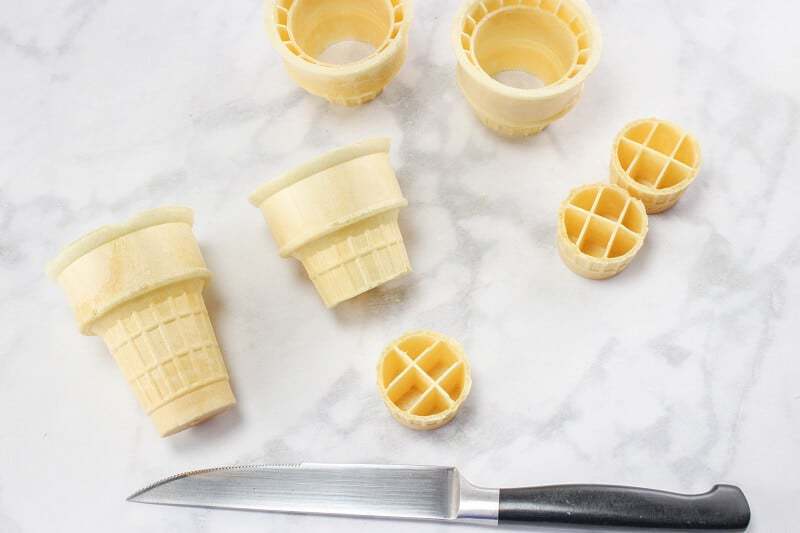
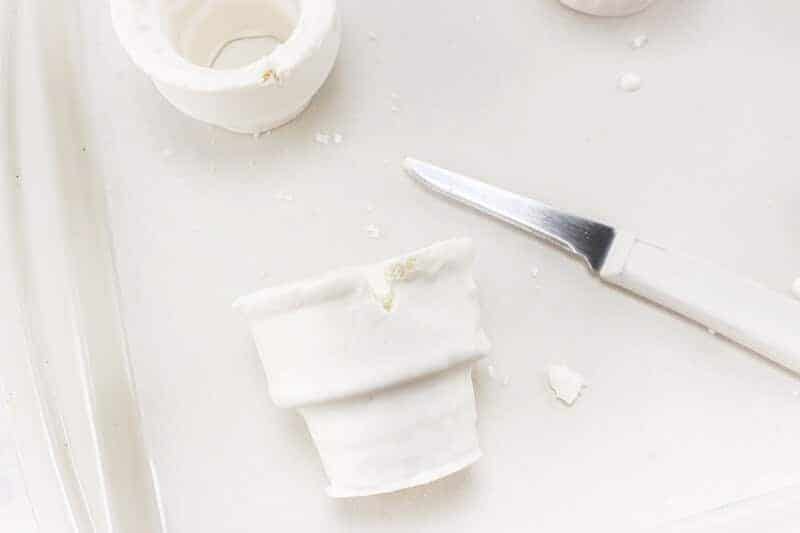
First, cut about 1/3 of the bottom off of each ice cream cone.
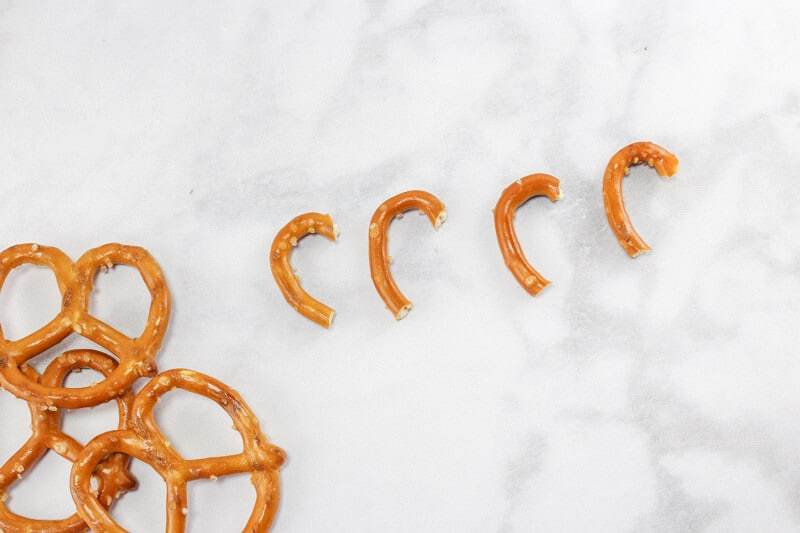
Then, break off rounded edges from the pretzels so they look like little cup handles.
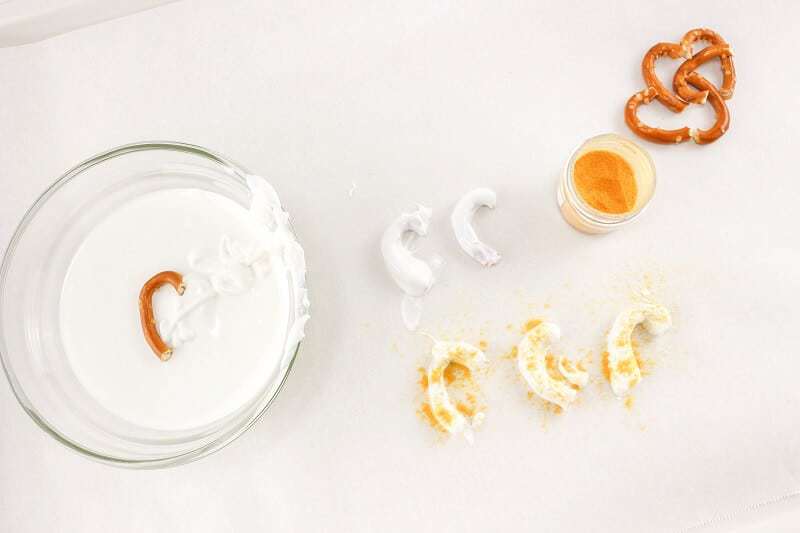
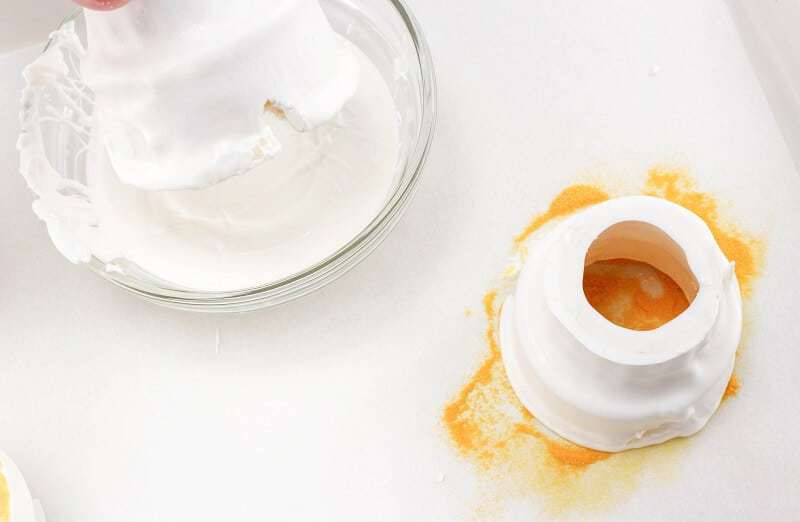
Place white candy melts in a bowl, and microwave in 30 second intervals, stirring each time, until melted. Dip the little pretzel handles into melted chocolate until coated and place on parchment paper. Sprinkle on edible gold glitter. Let Dry.
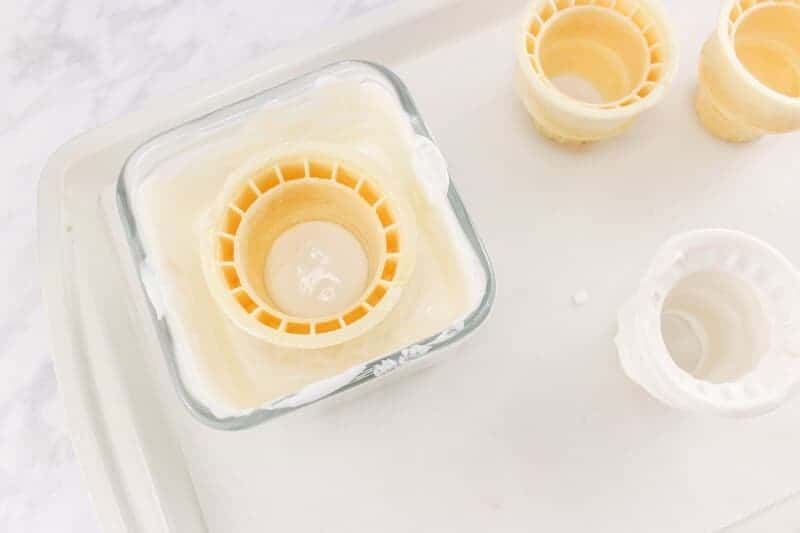
Dip ice cream cones into melted chocolate until covered inside and out, place on parchment paper and let dry.
Cut a small V-shape into the top of the cone to symbolize the chip.
Next, dip each end of the cone into the melted candy melts and lightly dip into the glitter to form a gold rim on each end of the cone.
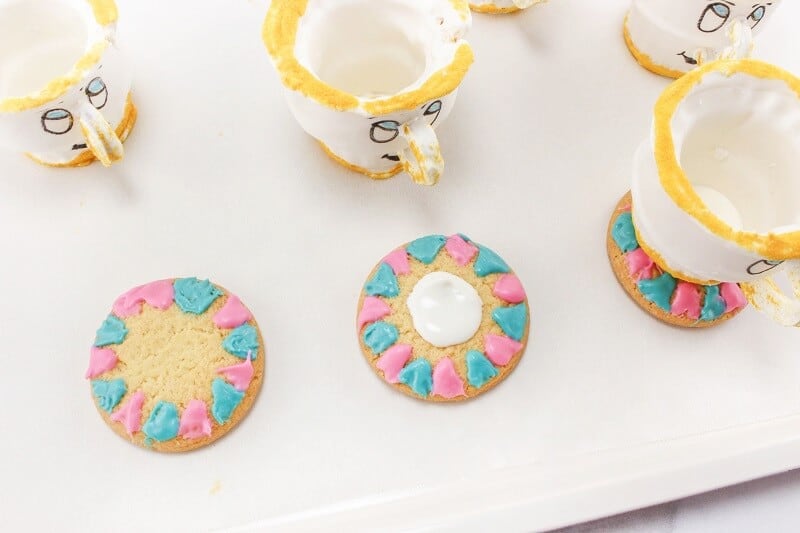
Heat the pink and blue drizzle pouches according to package directions, and make little triangle shapes around the edge of the cookie, alternating each color.

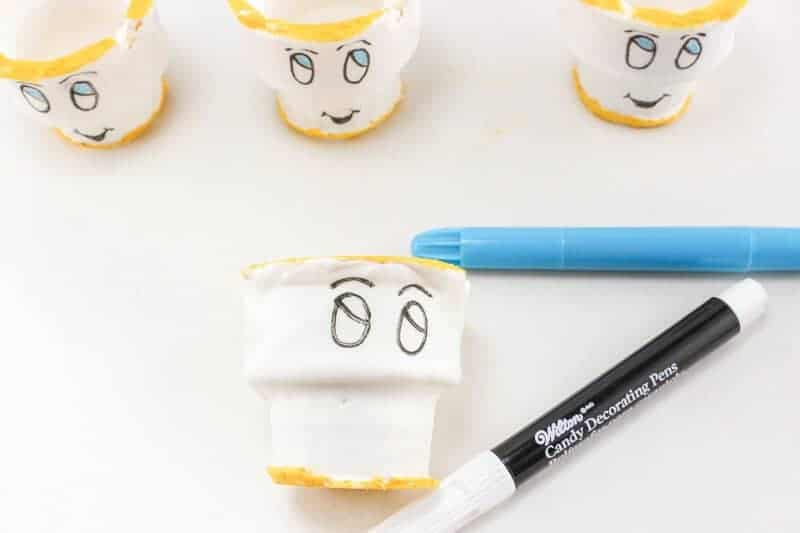
Next, draw on Chip the Teacup’s eyes and mouth. You can use an edible food marker or use a brown color drizzle pouch to do this as well, whichever you prefer.
Finally, place a small circle of melted chocolate in the center of the cookie and set the cone on it, then put a little more chocolate on the inside of the cone to make sure it sticks to the cookie. Let dry.
That’s it! Enjoy your adorable Chip the Teacup treats!
Chip the Teacup Dessert
Ingredients
- 6 Keebler Butter Cookies or similar
- 6 ice cream cones
- 1 bag Bright White Candy Melts 12 ounces
- edible gold glitter
- 6 pretzel twists
- 1 cup Blue Candy Melts or Drizzle Pouch
- 1 cup Pink Candy Melts or Drizzle Pouch
- edible markers optional
Instructions
- Cut about 1/3 of the bottom off each cone.
- Break off rounded edges from the pretzels so they look like little cup handles.
- Place white candy melts in a bowl, and microwave in 30 second intervals, stirring each time, until melted.
- Dip the little pretzel handles into melted chocolate until coated and place on parchment paper. Sprinkle on edible gold glitter. Let Dry
- Dip ice cream cones into melted chocolate until covered inside and out, place on parchment paper and let dry. Cut a small V-shape into the top of the cone to symbolize the chip.
- Next, dip each end of the cone into the melted candy melts and lightly dip into the glitter to form a gold rim on each end of the cone.
- Heat the pink and blue drizzle pouches according to package directions, and make little triangle shapes around the edge of the cookie, alternating each color.
- Next, draw on Chip’s eyes and mouth using edible markers.
- Finally, place a small circle of melted chocolate in the center of the cookie and set the cone on it, then put a little more chocolate on the inside of the cone to make sure it sticks to the cookie. Allow 30 minutes to set before serving.
Notes
Nutrition

Did You Make This Recipe?
Share it with me on Instagram @crayonsandcravings and follow on Pinterest @crayonsandcravings for even more!


I HAD to pin this adorable activity that I would love to create with my grandkids! Chip is one of my favorite characters too. I don’t know if we can eat these cute little cups when they are done ?
I never would have guessed it was ice cream cones that formed the teacup. Such a cute idea!!!
I never could have come up with these ideas on my own! Thanks for sharing!
Yum and Fun!
We love Beauty and the Beast. Such a great project. I will have to do this with my grandchildren. They will love it
Wow, that’s a lot of work! You did a good job :o)
Kids would go crazy for these! What a cute idea.